
Nissan Sentra Service Manual: Water outlet
Exploded View
CVT MODELS
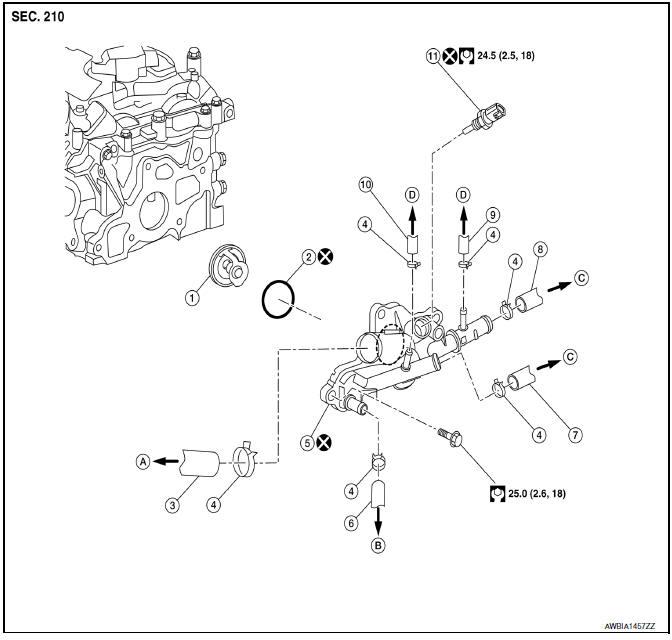
- Water control valve
- Rubber ring
- Radiator hose (upper)
- Clamp
- Water outlet
- CVT oil warmer hose (outlet)
- Heater hose (inlet)
- Heater hose (outlet)
- Electric throttle control actuator hose (outlet)
- Electric throttle control actuator hose (inlet)
- Engine coolant temperature sensor
- To filler neck
- To CVT oil warmer
- To heater core
- To electric throttle control actuator
M/T Models
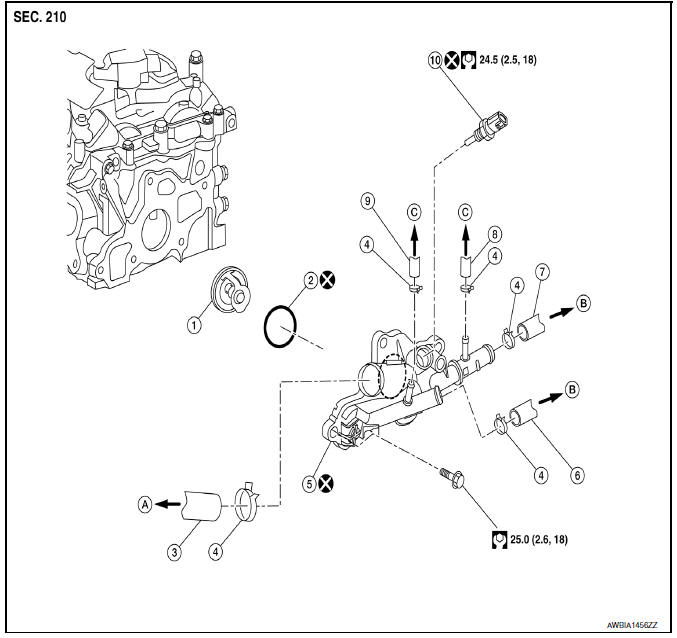
- Water control valve
- Rubber ring
- Radiator hose (upper)
- Clamp
- Water outlet
- Heater hose (inlet)
- Heater hose (outlet)
- Electric throttle control actuator hose (outlet)
- Electric throttle control actuator hose (inlet)
- Engine coolant temperature sensor
- To filler neck
- To heater core
- To electric throttle control actuator
WARNING:
Do not remove the radiator cap when the engine is hot. Serious burns could occur from high-pressure engine coolant escaping from the radiator. Wrap a thick cloth around the cap. Slowly push down and turn it a quarter turn to allow built-up pressure to escape. Carefully remove the cap by pushing it down and turning it all the way.
NOTE:
When removing components such as hoses, tubes/lines, etc., cap or plug openings to prevent fluid from spilling.
Removal and Installation
REMOVAL
- Remove the battery. Refer to PG-50, "Removal and Installation (Battery)".
- Drain engine coolant from radiator. Refer to CO-12, "Changing Engine Coolant".
CAUTION:
- Perform this step when the engine is cold.
- Do not spill engine coolant on the drive belt.
- Remove engine under cover. Refer to EM-24, "Exploded View".
- Remove air cleaner and air duct. EM-25, "Removal and Installation".
- Disconnect engine coolant temperature sensor.
- Remove radiator hose (upper), water hoses and heater hoses from water outlet.
- Remove water outlet bolts and remove water outlet and rubber ring with water control valve.
- Remove engine coolant temperature sensor from water outlet, if necessary.
INSPECTION AFTER REMOVAL
- Place a thread (A) so that it is caught in the valves of the water
control valve (1). Immerse fully in a container (B) filled with water.
Heat while stirring.
- The valve opening temperature is the temperature at which the valve opens and the water control valve falls from the thread.
- Continue heating. Check the full-open lift amount.
NOTE:
The full-open lift amount standard temperature for the water control valve is the reference value.
- After checking the full-open lift amount, lower the water temperature and check the valve closing temperature.
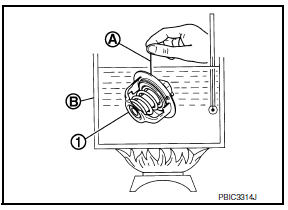

- If valve setting at measured values are out of standard range, replace water control valve.
INSTALLATION
Installation is in the reverse order of removal.
Install the engine coolant temperature sensor if removed.
Use Genuine RTV Silicone Sealant or equivalent. Refer to MA-11, "Fluids and Lubricants".
CAUTION:
- Do not reuse rubber-ring.
- Do not reuse water outlet.
- If removed, do not reuse engine coolant temperature sensor.
- Install water control valve with the rubber ring (1) groove fit onto water control valve flange (A).
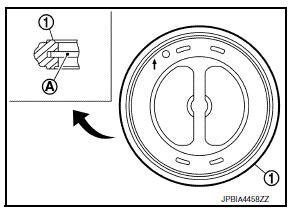
- Install water control valve (2) with the arrow (A) facing up, and the frame center part (B) facing engine.
(1) : Water outlet
CAUTION:
Do not spill engine coolant in engine compartment. Use a shop cloth to absorb engine coolant.
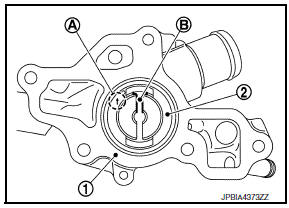
INSPECTION AFTER INSTALLATION
After installation, refill engine coolant and check for leaks. Refer to CO-11, "System Inspection" and CO-12, "Changing Engine Coolant".
 Thermostat and thermostat housing
Exploded View
Thermostat housing
Gasket
Rubber ring
Thermostat
Water inlet
Clamp
Radiator hose (upper)
To radiator
WARNING:
Do not remove the radiator cap when the engin ...
 Service data and specifications
(sds)
Service data and specifications
(sds)
Periodical Maintenance Specification
ENGINE COOLANT CAPACITY (APPROXIMATE)
Radiator
Thermostat
Water Control Valve
...
Other materials:
Front power window motor
Removal and Installation
REMOVAL
Remove the front door glass regulator (2). Refer to GW-16,
"Removal and Installation".
Remove the bolts (A) and the front power window motor (1).
INSTALLATION
Installation is in the reverse order of removal. ...
Fuel injector and fuel tube
Exploded View
Bracket
Fuel tube bracket
Fuel feed tube
Quick connector cap
Fuel tube
O-ring (black)
Fuel injector
O-ring (green)
Injector clip
CAUTION:
Do not remove or disassemble parts unless instructed.
Removal and Installation
WARNING:
Put a “CAUTION: FLAM ...
Turn signal lamp circuit
Description
The bcm monitors inputs from the combination switch to determine when to
activate the turn signals. The
bcm outputs voltage direction to the left and right turn signals during turn
signal operation or both during hazard
warning operation. The bcm sends a turn signal indicator req ...
