
Nissan Sentra Service Manual: Thermostat and thermostat housing
Exploded View
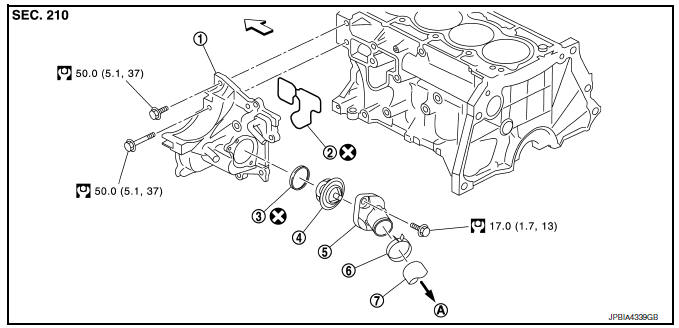
- Thermostat housing
- Gasket
- Rubber ring
- Thermostat
- Water inlet
- Clamp
- Radiator hose (upper)
- To radiator
WARNING:
Do not remove the radiator cap when the engine is hot. Serious burns could occur from high-pressure engine coolant escaping from the radiator. Wrap a thick cloth around the cap. Slowly push down and turn it a quarter turn to allow built-up pressure to escape. Carefully remove the cap by pushing it down and turning it all the way.
NOTE:
When removing components such as hoses, tubes/lines, etc., cap or plug openings to prevent fluid from spilling.
Removal and Installation of Thermostat
REMOVAL
- Remove engine under cover. Refer to EXT-16, "Exploded View".
- Drain engine coolant from radiator. Refer to CO-12, "Changing Engine Coolant".
CAUTION:
- Perform this step when the engine is cold.
- Do not spill engine coolant on the drive belt.
- Disconnect radiator hose (lower) from water inlet side. Refer to CO-15, "Exploded View".
- Remove water inlet bolts, then remove water inlet and thermostat.
Inspection after removal
- Place a thread (A) so that it is caught in the valves of the thermostat (1). Immerse fully in a container (B) filled with water. Heat while stirring.
- The valve opening temperature is the temperature at which the valve opens and the thermostat falls from the thread.
- Continue heating. Check the full-open lift amount.
NOTE:
The full-open lift amount standard temperature for the thermostat is the reference value.
- After checking the full-open lift amount, lower the water temperature and check the valve closing temperature.
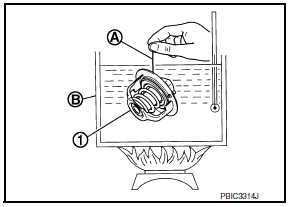

- If valve setting at measured values are out of standard range, replace thermostat.
Installation
Installation is in the reverse order of removal.
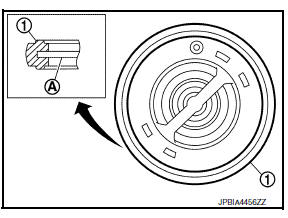
- Install the thermostat with the whole circumference of the flange (A) fitting securely inside the rubber ring (1).
CAUTION:
Do not reuse rubber ring.
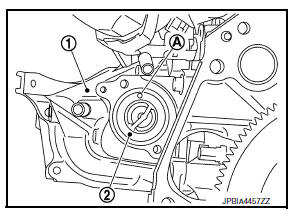
- Install the thermostat (2) into the thermostat housing (1) with the jiggle valve (A) facing upwards. The position deviation may be within the range of В±10В°.
- After installation, refill engine coolant and check for leaks. Refer to CO-12, "Changing Engine Coolant" and CO-11, "System Inspection".
Removal and Installation of Thermostat Housing
REMOVAL
- Remove the generator. Refer to CHG-29, "Removal and Installation".
- Partially remove the fender protector (LH). Refer to EXT-28, "FENDER PROTECTOR : Removal and Installation - Front Fender Protector".
- Remove the thermostat housing bolts, then remove the thermostat housing.
- Remove thermostat if necessary. Refer to CO-21, "Removal and Installation of Thermostat".
- Remove water pump if necessary. Refer to CO-19, "Removal and Installation".
INSTALLATION
Installation is in the reverse order of removal.
CAUTION:
- Do not reuse gasket
- Do not spill engine coolant on the drive belt.
Inspection
INSPECTION AFTER INSTALLATION
After installation, refill engine coolant and check for leaks. Refer to CO-11, "System Inspection" and CO-12, "Changing Engine Coolant".
 Water pump
Exploded View
Gasket
Water pump
WARNING:
Do not remove the radiator cap when the engine is hot. Serious burns
could occur from high-pressure
engine coolant escaping from the radiator. ...
 Water outlet
Exploded View
CVT MODELS
Water control valve
Rubber ring
Radiator hose (upper)
Clamp
Water outlet
CVT oil warmer hose (outlet)
Heater hose (inlet)
Heater hose (outlet)
Electr ...
Other materials:
Ecu diagnosis information
Av control unit
Reference value
TERMINAL LAYOUT
PHYSICAL VALUES
Dtc index
...
Precaution for Supplemental Restraint System (SRS) "AIR BAG" and "SEAT BELT
PRE-TENSIONER"
The Supplemental Restraint System such as “AIR BAG” and “SEAT BELT PRE-TENSIONER”,
used along
with a front seat belt, helps to reduce the risk or severity of injury to the
driver and front passenger for certain
types of collision. Information necessary to service the system ...
Wiring diagram
Navigation with bose
Wiring diagram
...
