Nissan Sentra Owners Manual: iPod®* player operation without Navigation System (if so equipped)
Connecting iPod®
| WARNING Do not connect, disconnect or operate the USB device while driving. Doing so can be a distraction. If distracted you could lose control of your vehicle and cause an accident or serious injury. |
CAUTION
- Do not force the USB device into the USB port. Inserting the USB device tilted or up-side-down into the port may damage the port. Make sure that the USB device is connected correctly into the USB port.
- Do not grab the USB port cover (if so equipped) when pulling the USB device out of the port. This could damage the port and the cover.
- Do not leave the USB cable in a place
where it can be pulled unintentionally.
Pulling the cable may damage the port.
Refer to your device manufacturerŌĆÖs owner information regarding the proper use and care of the device.
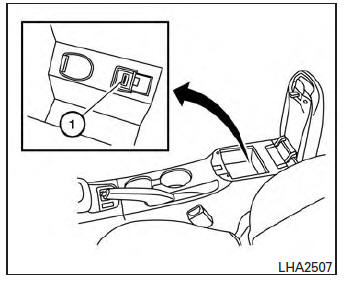
To connect an iPod® to the vehicle so that the iPod® can be controlled with the audio system controls and display screen, use the USB jack located in the center console 1 . Connect the iPod®-specific end of the cable to the iPod® and the USB end of the cable to the USB jack on the vehicle. If your iPod® supports charging via a USB connection, its battery will be charged while connected to the vehicle with the ignition switch in the ACC or ON position.
While connected to the vehicle, the iPod® may only be able to be operated by the vehicle audio controls.
To disconnect the iPod® from the vehicle, remove the USB end of the cable from the USB jack on the vehicle, then remove the cable from the iPod®.
* iPod® is a trademark of Apple Inc., registered in the U.S. and other countries.
Compatibility
The following models are compatible:
- iPod® 5th Generation (firmware version 1.3 or later)
- iPod® Classic (80GB) (firmware version 1.1.2PC or later)
- iPod® Classic (120GB) (firmware version 2.0.1PC or later)
- iPod® nano - 1st generation (firmware version 1.3.1 or later)
- iPod® nano - 2nd generation (firmware version 1.1.3 or later)
- iPod® nano - 3rd generation (firmware version 1.1.3PC or later)
- iPod® nano - 4th generation (firmware version 1.0PC or later)
- iPod® nano - 5th generation (8GB) (firmware version 1.0.2PC or later)
- iPod® nano - 5th generation (16GB) (firmware version 1.0.1PC or later)
- iPod® nano - 6th generation (8GB) (firmware version 1.2PC or later)
- iPod® nano - 6th generation (8GB) (firmware version 1.1PC or later)
- iPod® Touch - 1st generation (firmware version 2.2.1 or later)
- iPod® Touch - 2nd generation (firmware version 2.2.1 or later)
- iPod® Touch - 3rd generation (firmware version 3.1.3 or later)
- iPod® Touch - 4th generation (firmware version 4.3.5 or later)
- iPhone® 3G (firmware version 4.1 or later)
- iPhone® 3GS (firmware version 4.3 or later)
- iPhone® 4 (firmware version 5.0 or later)
- iPhone® 4S (firmware version 5.1 or later)
- iPad® (firmware version 4.3.2 or later)
- iPad® 2 (firmware version 4.3.3 or later)
Make sure that your iPod® firmware is updated to the version indicated above.
Audio main operation
Place the ignition switch to the ACC or ON position. Then, press the CD┬ĘAUX or iPod┬« MENU button repeatedly to switch to the iPod┬« mode.
If the audio system is turned off while the iPod® is playing, the iPod® plays when the audio system is turned back on.
If the audio system is off, pressing the CD┬ĘAUX or iPod┬« MENU button turns the audio system on and plays the iPod┬«.
If the audio system is on, the audio system automatically begins playing tracks from the iPod® when it is plugged into the jack.
iPod® MENU button:
Press the iPod┬« MENU button while the iPod┬« is connected to show the iPod┬« operation menu on the audio display. Scroll through the menu list using the TUNE┬ĘSCROLL control dial. Press ENTER to select a menu item. Items in the iPod┬« menu appear on the display in the following order:
- Now playing
- Playlists
- Artists
- Artists
- Songs
- Podcasts
- Genres
- Composers
- Audiobooks
- Shuffle songs
For more information about each item, see the iPod┬« OwnerŌĆÖs Manual.
 SEEK/CAT buttons:
Press the SEEK/CAT buttons  or
or
 to
to
skip backward or forward one track.
Press and hold the SEEK/CAT buttons
or  for 1.5 seconds while a track
is playing
to reverse or fast forward the track being played.
The track plays at an increased speed while reversing or fast forwarding. When the button is released, the track returns to normal play speed.
REPEAT (RPT):
When the RPT button is pressed while a track is being played, the play pattern can be changed as follows:
Repeat Off → 1 Track Repeat → All Repeat → Repeat Off
1 Track Repeat: the current track will be repeated.
All Repeat: all songs in the current list are repeated.
Repeat Off: no repeat play pattern is applied.
RANDOM (RDM):
When the RDM button is pressed while a track is being played, the play pattern can be changed as follows: Shuffle Off → Track Shuffle → Album Shuffle → Shuffle Off
Track Shuffle: the tracks in the current list will be played randomly.
Album Shuffle: the albums in the current list will be played randomly.
Shuffle Off: no random play pattern is applied.
BACK button:
When the BACK button is pressed, it returns to the previous menu.
 USB interface (models with Navigation System)
Connecting a device to the USB input
jack
WARNINGDo not connect, disconnect, or operate the
USB device while driving. Doing so can be
a distraction. If distracted you could lose
...
 iPod®* player operation with Navigation System (if so equipped)
Connecting iPod®
WARNINGDo not connect, disconnect or operate the
USB device while driving. Doing so can be
a distraction. If distracted you could lose
control of your vehicle an ...
Other materials:
Special Service Tool
The actual shapes of Kent-Moore tools may differ from those of special
service tools illustrated here.
CAUTION:
Every time the vehicle is lifted up, maintain the complete vehicle
curb condition.
Since the vehicle's center of gravity changes when removing main
parts on the front si ...
Glass lid
Exploded view
Glass lid
Roof panel
Front
Removal and installation
Removal
Caution:
After installing glass lid, check gap/height adjustments and
operation to make sure there is no malfunction.
Handle glass lid with care to prevent damage.
Open sunshade (1), then close ...
Disassembly and assembly
FUEL LEVEL SENSOR UNIT
Exploded View
Fuel Level Sensor Unit
Fuel filter and pump assembly
Fuel level sensor unit
Float arm assembly
Fuel tank temperature sensor
Fuel level sensor unit/fuel tank temperature sensor harness connector
Disassembly and Assembly
DISASSEMBLY
Discon ...
