Nissan Sentra Service Manual: Washer nozzle & tube
Exploded view
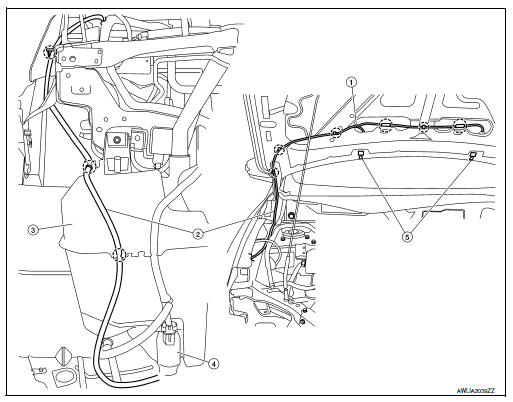
- Check valve
- Washer tube
- Washer tank
- Washer pump
- Washer nozzle
 Clip
Clip
Washer nozzle
Washer nozzle : removal and installation
REMOVAL
- Disconnect the washer nozzle from the hood by pushing on the nozzle in the order and direction shown.
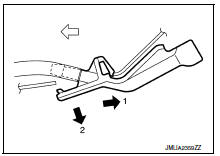
- Disconnect the washer tube from the washer nozzle.
- Remove the washer nozzle.
INSTALLATION
Installation is in the reverse order of removal.
CAUTION:
Adjust the nozzle spray pattern. Refer to WW-55, "WASHER NOZZLE : Adjustment".
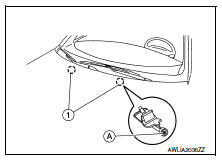
Washer nozzle : adjustment
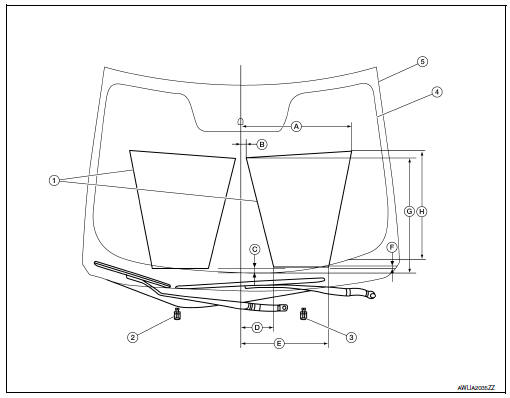
- Washer fluid spray pattern
- Washer nozzle (RH)
- Washer nozzle (LH)
- Black print
- Windshield glass
- 487.0 mm (19.2 in)
- 22.2 mm (0.9 in)
- 15.3 mm (0.6 in)
- 145.9 mm (5.7 in)
- 384.9 mm (15.2 in)
- 15.0 mm (0.6 in)
- 499.7 mm (19.7 in)
- 470.2 mm (18.5 in)
NOTE:
Spray position for (LH) shown. (RH) is symmetrical.
Insert a suitable tool into the nozzle hole (A) and move up/down and left/right to adjust the spray position of each nozzle (1).
Washer tube
Washer tube : removal and installation
REMOVAL
- Drain the washer fluid.
- Disconnect the washer tube from the washer nozzles (LH/RH). Refer to WW-54, "WASHER NOZZLE : Removal and Installation".
- Remove the front under cover. Refer to EXT-30, "FRONT UNDER COVER : Removal and Installation".
- Disconnect the washer tube from the washer pump.
- Remove the washer tube from the clips and remove the washer tube.
INSTALLATION
Installation is in the reverse order of removal.
NOTE:
Fill washer tank with specified amount of fluid. Refer to WW-64, "Specifications".
 Washer tank
Exploded view
Washer tank inlet
Washer tank
Washer level switch
Washer tank seal
Washer pump
Removal and installation
REMOVAL
Drain the washer fluid.
Remove the front under ...
 Front wiper arm
Exploded View
Wiper blade (RH)
Wiper arm (RH)
Wiper drive assembly
Wiper arm (LH)
Wiper blade (LH)
Removal and Installation
REMOVAL
Remove the wiper arm cap.
Remove the wipe ...
Other materials:
P0441 EVAP Control system
DTC Logic
DTC DETECTION LOGIC
NOTE:
If DTC P0441 is displayed with other DTC such as P2122, P2123, P2127,
P2128 or P2138, first perform
trouble diagnosis for other DTC.
In this evaporative emission (EVAP) control system, purge flow occurs during
non-closed throttle conditions.
Purge volu ...
Diagnosis system (bcm) (without intelligent key system)
Common item
COMMON ITEM : CONSULT Function (BCM - COMMON ITEM)
APPLICATION ITEM
CONSULT performs the following functions via CAN communication with BCM.
Direct Diagnostic Mode
Description
ECU identification
The BCM part number is displayed.
Self Diagnostic Result
...
System
Moonroof
Moonroof : system diagram
Moonroof : system description
Moonroof system
Input/output signal chart
Moonroof operation
Moonroof motor assembly operates with the power supply that is output
from bcm while ignition switch is
on or retained power is operating.
Tilt up/ do ...
