
Nissan Sentra Service Manual: Starter motor drive control
STARTER MOTOR DRIVE CONTROL : System Description
SYSTEN DIAGRAM
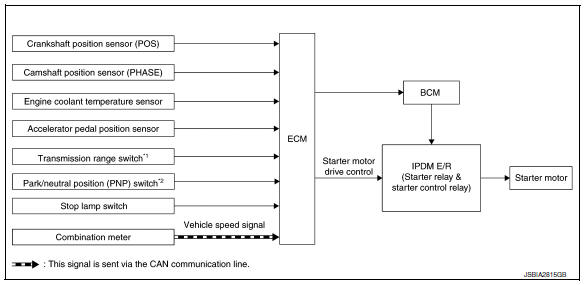
*1: CVT models
*2: M/T models
INPUT/OUTPUT SIGNAL CHART
| Sensor | Input signal to ECM | ECM function | Actuator | |
| Crankshaft position sensor (POS) |
|
Starter motor drive control |
|
|
| Camshaft position sensor (PHASE) | ||||
| Engine coolant temperature sensor | Engine coolant temperature | |||
| Accelerator pedal position sensor | Accelerator pedal position | |||
| Transmission range switch (CVT) | Gear position | |||
| Park/ Neutral position switch (M/T) | Gear position | |||
| Stop lamp switch | Brake pedal position | |||
| Combination meter | CAN communication | Vehicle speed signal | ||
SYSTEM DESCRIPTION
When rapid deceleration occurs during engine runs or idle speed decreases due to heavy load conditions, ECM detects a decrease in idle speed and restarts the engine to secure reliability in handleability by transmitting a cranking request signal to IPDM E/R for activating the starter motor under the following conditions:
- Selector lever: Other than P and N (CVT models)
- Shifter lever: Other than neutral position (M/T models)
- Idle switch: ON (Accelerator pedal not depressed)
- Brake switch: ON (Brake pedal depressed)
ECM transmits a control signal to IPDM E/R via BCM by CAN communication.
IPDM E/R detects an operating state of the starter motor relay and the starter motor control relay and transmits a feed back signal to ECM via CAN Communication.
 Cooling fan control
SYSTEM DIAGRAM
SYSTEM DESCRIPTION
ECM controls cooling fan speed corresponding to vehicle speed, engine coolant
temperature, refrigerant pressure,
air conditioner ON signal. Then control syst ...
 Evaporative emission system
EVAPORATIVE EMISSION SYSTEM : System Description
SYSTEM DIAGRAM
INPUT/OUTPUT SIGNAL CHART
Sensor
Input signal to ECM
ECM function
Actuator
Crankshaft position sensor (P ...
Other materials:
Transmitter
Exploded View
Transmitter (tire pressure sensor)
O-ring
Valve stem nut
Valve core
Valve cap
Valve stem assembly
Parts that are replaced as a set
when the tire is replaced.
Removal and Installation
REMOVAL
Remove road wheel and tire assembly using power tool.
Remove val ...
Removal and installation
SIDE OIL SEAL
Removal and Installation
REMOVAL
Remove front drive shafts. Refer to FAX-18, "6M/T : Removal and
Installation (LH)".
Remove differential side oil seals (1) from clutch housing and
transaxle case using a suitable tool.
CAUTION:
Do not damage transaxle case an ...
Diagnosis description : counter system
RELATIONSHIP BETWEEN MIL, 1ST TRIP DTC, DTC, AND DETECTABLE ITEMS
When a malfunction is detected for the first time, the 1st trip DTC and
the 1st trip freeze frame data are
stored in the ECM memory.
When the same malfunction is detected in two consecutive trips, the DTC
and the freeze ...
