
Nissan Sentra Service Manual: Rear drum brake
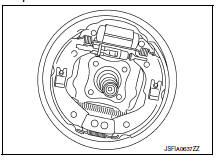
BRAKE CALIPER ASSEMBLY : Exploded View
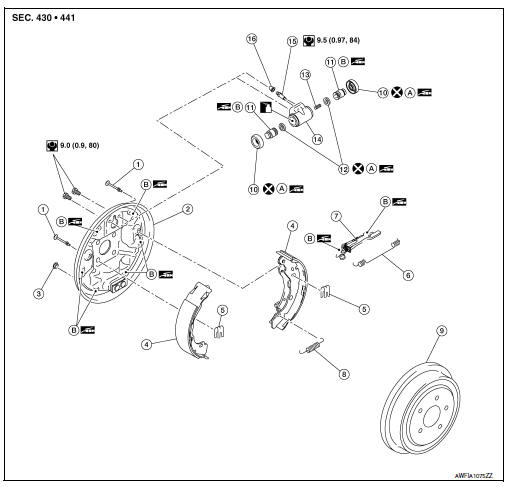
- Shoe hold pin
- Back plate
- Plug
- Brake shoe
- Spring
- Upper spring
- Adjuster
- Return spring
- Brake drum
- Boot
- Piston
- Piston cup
- Spring
- Wheel cylinder
- Bleeder valve
- Cap
- Apply rubber grease
- Apply PBC (Poly Butyl Cuprysil) grease or silicone-based grease
 Apply brake fluid
BRAKE CALIPER ASSEMBLY : Removal and Installation
WARNING:
Clean dust from brake drum and shoe assembly with a vacuum dust collector to minimize the hazard of air borne particles or other materials.
CAUTION:
- Do not depress the brake pedal while removing the brake drum because the pistons may pop out.
- Do not drop the removed parts.
- Do not spill or splash brake fluid on painted surfaces. Brake fluid may damage paint. If brake fluid is splashed on painted areas, wash it away with water immediately.
- Do not spill or splash brake fluid on the brake drum.
REMOVAL
NOTE:
When removing components such as hoses, tubes/lines, etc., cap or plug openings to prevent fluid from spilling.
- Remove rear wheels and tires using power tool. Refer to WT-47, "Removal and Installation".
- Drain the brake fluid when removing or disassembling the wheel cylinder is necessary. Refer to BR-17, "Drain and Refill".
- Remove the brake drum. Refer to BR-42, "Exploded View".
NOTE:
- Make sure the parking brake lever is fully released prior to removal of the brake drum.
- The rear wheel hub is housed inside the brake drum.
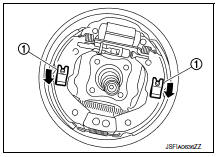
- Remove the springs (1) by pushing them inward toward the vehicle and rotating, this will release the shoe hold pins, and the brake shoe assembly (brake shoes, each spring, and adjuster).
CAUTION:
Do not damage the boot of the wheel cylinder.
- Disconnect the parking brake cable from operating lever.
CAUTION:
Do not bend the parking brake lever.
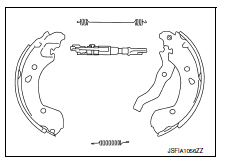
- Disassemble the brake shoe assembly (brake shoe, each spring, and adjuster).
- Remove the wheel cylinder with the following procedure.
- Disconnect the brake tube from the wheel cylinder.
- Remove the two bolts and the wheel cylinder from back plate.
INSPECTION AFTER REMOVAL
Check the following items and replace if necessary.
- Check the brake lining for excessive wear, damage, and peeling.
- Check the brake shoe sliding surface for excessive wear and damage.
- Check each spring for settling, excessive wear, damage, and rust.
- Check the adjuster for smoothness, and check it for excessive wear, damage, and rust.
- Check the back plate for damage, cracks, and deformation.
- Check the wheel cylinder for cracks, damage, and leakage of brake fluid.
- Visually check the brake drum for excessive wear, cracks, and damage with a pair of vernier calipers.
- Check the drum brake component parts for excessive wear, damage, and rust.
INSTALLATION
Installation is in the reverse order of removal.
CAUTION:
- Apply lubrication to the directed areas only.
- Do not damage the wheel cylinder.
- Check the difference between left and right wheel of adjuster.
 : Front
| Adjuster | Direction |
| Left side | Left screw |
| Right side | Right screw |
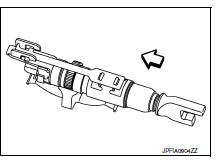
- Shorten the length of the adjuster by rotating it.
- Apply PBC (Poly Butyl Cuprysil) grease or silicone-based grease to the mating surfaces between the adjusters and the brake shoes.
- Apply PBC (Poly Butyl Cuprysil) grease or silicone-based grease to the mating surfaces between the back plates and the brake shoes.
- Apply PBC (Poly Butyl Cuprysil) grease or silicone-based grease to the pistons.
- Check the component parts of drum brake assembly are installed properly.
- Check the brake shoe sliding surface and brake drum inner surface for grease. Make sure that grease does not contact the lining material.
- Perform the air bleeding when removed or disassembled the wheel cylinder. Refer to BR-17, "Bleeding Brake System".
- Adjust the brake shoe clearance (parking brake lever stroke) after installation and air bleeding. Refer to BR-13, "BRAKE LINING : Inspection".
INSPECTION AFTER INSTALLATION
- Check that the component parts of drum brake assembly are installed properly.
- Rotate the brake drum and check that there is no drag. Perform the following procedure if necessary.
- Remove the brake shoe.
- Push the piston.
CAUTION:
Push both sides of the piston simultaneously.
- Install the brake shoe.
- Adjust the brake shoe clearance (parking brake lever stroke). Refer to BR-13, "BRAKE LINING : Inspection".
- Check drag of rear drum brake again. If any drag is found, disassemble the wheel cylinder and replace if necessary. Refer to BR-51, "Disassembly and Assembly".
- Burnish contact surface between brake lining and brake drum after refinishing or replacing brake lining or brake drum, or if a soft pedal occurs at very low mileage. Refer to BR-20, "Brake Burnishing".
ADJUSTMENT AFTER INSTALLATION
Adjust the brake shoe clearance (parking brake lever stroke). Refer to BR-13, "BRAKE LINING : Inspection".
 Front disc brake
BRAKE PAD
BRAKE PAD : Exploded View
Cylinder body
Inner shim cover
Inner shim
Inner pad (with pad wear sensor)
Pad retainer
Torque member
Outer pad
Outer shim
Outer shim cover ...
 Rear disc brake
BRAKE PAD
BRAKE PAD : Exploded View
Upper sliding pin bolt
Lower sliding pin bolt
Bushing
Cylinder body
Inner shim cover
Inner shim
Inner pad (with pad wear sensor)
Pad retaine ...
Other materials:
Installing front license plate
Use the following steps to mount the front license
plate:
Make holes on the plastic finisher at the
location mark (small dimple) using a 0.20 in
(5 mm) drill. Apply light pressure to the drill.
Install the license plate holder using the two
screws provided with the holder.
Mount ...
OIL PAN
Exploded View
Transaxle assembly
Oil pan gasket
Magnet
Oil pan
Overflow tube
Drain plug gasket
Drain plug
Oil pan fitting bolt
: Always replace after every
disassembly.
: NВ·m (kg-m, ft-lb)
: NВ·m (kg-m, it-lb)
Removal and Installation
REMOVAL
Remove the en ...
P1226 TP Sensor
DTC Logic
DTC DETECTION LOGIC
DTC No.
CONSULT screen terms
(Trouble diagnosis content)
DTC detecting condition
Possible cause
P1226
CTP LEARNING-B1
(CTP LEARNING-B1)
Closed throttle position learning is not performed
successfully, repeatedly.
Electric thr ...
