Nissan Sentra Service Manual: Evap canister
Exploded View
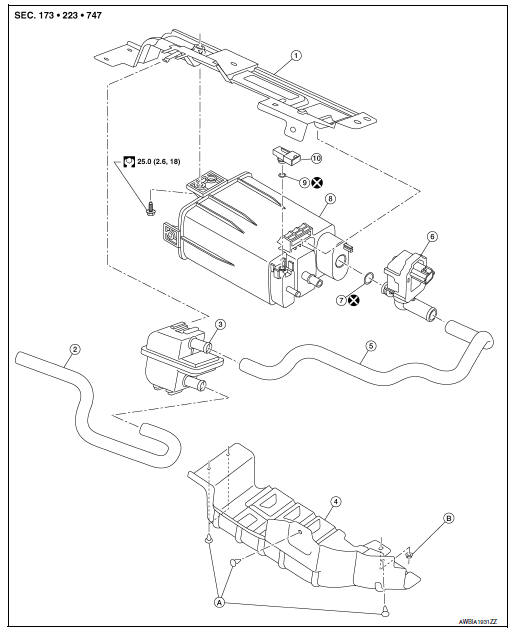
- EVAP canister bracket
- EVAP canister filter drain hose
- EVAP canister filter
- EVAP canister protector
- EVAP hose
- EVAP canister vent control valve
- O-ring
- EVAP canister
- O-ring
- EVAP canister control pressure sensor
- Clip
- Nut
Removal and Installation
EVAP CANISTER
Removal
- Remove EVAP canister protector.
- Disconnect the harness connector from EVAP canister control pressure sensor.
- Remove the EVAP canister control pressure sensor and O-ring, if necessary.
CAUTION:
Do not reuse O-ring.
- Disconnect EVAP canister purge hose.
- Disconnect fuel tank EVAP breather hose.
- Disconnect the harness connector from EVAP vent control valve.
- Disconnect the EVAP vent control valve hose.
- Remove the EVAP canister bolt.
- Remove the EVAP canister.
- Remove the EVAP vent control valve and O-ring, if necessary.
CAUTION:
Do not reuse O-ring.
Installation
Installation is in the reverse order of removal.
CAUTION:
Do not reuse O-ring.
EVAP CANISTER CONTROL PRESSURE SENSOR
Removal
- Remove EVAP canister protector.
- Disconnect the EVAP control pressure sensor harness connector (1).
- Remove the EVAP canister control pressure sensor and O-ring.
CAUTION:
Do not reuse O-ring.
Installation
Installation is in the reverse order of removal.
CAUTION:
Do not reuse O-ring.
EVAP CANISTER VENT CONTROL VALVE
Removal
- Remove EVAP canister protector.
- Disconnect the harness connector from EVAP vent control valve.
- Disconnect the EVAP vent control valve hose.
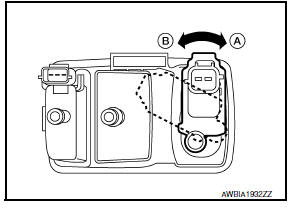
- Turn EVAP canister vent control valve counterclockwise.
- Clock
- Unclock
- Remove the EVAP canister vent control valve and O-ring.
CAUTION:
Do not reuse O-ring.
Installation
Installation is in the reverse order of removal.
CAUTION:
Do not reuse O-ring.
EVAP CANISTER FILTER
Removal
- Remove EVAP canister protector
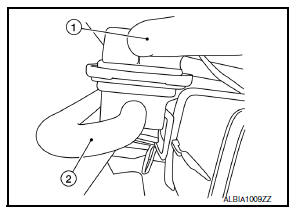
- Disconnect the EVAP canister filter drain hose (1).
- Disconnect the EVAP hose (2).
- Remove the EVAP canister filter.
Installation
Installation is in the reverse order of removal.
 Fuel tank
Exploded View
Fuel filler cap
Grommet
Fuel filler tube
Clamp
Fuel filler hose
Fuel tank
Fuel tank mounting band (RH)
Fuel tank mounting band (LH)
Vent hose
Removal and Insta ...
 Disassembly and assembly
FUEL LEVEL SENSOR UNIT
Exploded View
Fuel Level Sensor Unit
Fuel filter and pump assembly
Fuel level sensor unit
Float arm assembly
Fuel tank temperature sensor
Fuel level sensor uni ...
Other materials:
Tightening Torque Table (New Standard Included)
CAUTION:
The special parts are excluded.
The bolts/nuts in these tables have a strength (discrimination)
number/symbol assigned to the head
or the like. As to the relation between the strength grade in these tables
and the strength (discrimination)
number/symbol, refer to “DISCR ...
Symptom diagnosis
The eco mode indicator lamp does not turn on
Description
The ECO mode indicator lamp does not turn ON when the ECO mode switch is
operated.
Diagnosis Procedure
1.Perform combination meter on board diagnosis
Perform combination meter on board diagnosis. Refer to MWI-16, "Description" ...
Front power window motor
Removal and Installation
REMOVAL
Remove the front door glass regulator (2). Refer to GW-16,
"Removal and Installation".
Remove the bolts (A) and the front power window motor (1).
INSTALLATION
Installation is in the reverse order of removal. ...
