
Nissan Sentra Service Manual: Repairing material
Foam Repair
During factory assembly, foam insulators are installed in certain body panels and locations around the vehicle.
Use the following procedure(s) to replace any factory-installed foam insulators.
URETHANE FOAM APPLICATIONS
Use commercially available Urethane foam for sealant (foam material) repair of material used on vehicle.
<Urethane foam for foaming agent> 3Mв„ў Automixв„ў Flexible Foam 08463 or equivalent
Read instructions on product for fill procedures.
FILL PROCEDURES
Example of foaming agent filling operation procedure:
- Fill procedures after installation of service part.
- Eliminate foam material remaining on vehicle side.
- Clean area after eliminating form insulator and foam material.
- Install service part.
- Insert nozzle into hole (A) near fill area and fill foam material (1) or fill enough to close gap with the service part.
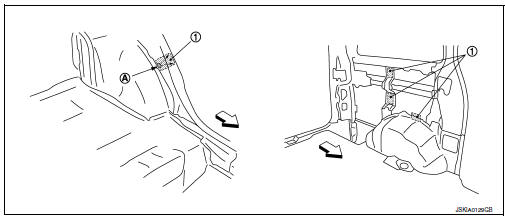
- Urethane foam
- Nozzle insert hole
 Front
Front
- Fill procedures before installation of service part:
- Eliminate foam material remaining on vehicle side.
- Clean area after eliminating foam insulator and foam material.
- Fill with enough foam material on the wheelhouse outer side to close the gap with the service part while avoiding the flange area.
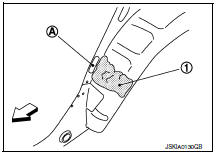
- Urethane foam
- Fill while avoiding flange area
 : Front
- Install service part.
NOTE:
Refer to the label on the urethane foam container for information on working times.
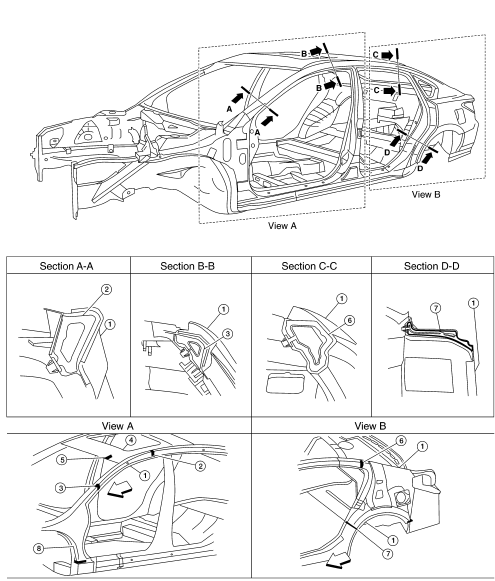
- Body side outer
- Body side insulation (foam) front pillar
- Body side insulation (foam) roof side rail
- Roof panel assembly
- Body side insulation (foam) rear pillar
- Body side insulation (foam) rear pillar lower
- Body side insulation strip, front pillar lower reinforcement
 Front
Front
 Preparation
...
 Body component parts
Moonroof panel assembly
Roof panel assembly
Front roof rail
Roof rail
Rear roof rail
Moonroof frame assembly
Hood assembly
Front fender (RH, LH)
Outer front door panel (RH, LH)
...
Other materials:
Evap canister
Exploded View
EVAP canister bracket
EVAP canister filter drain hose
EVAP canister filter
EVAP canister protector
EVAP hose
EVAP canister vent control valve
O-ring
EVAP canister
O-ring
EVAP canister control pressure sensor
Clip
Nut
Removal and Installation
EVAP ...
P2096, P2097 A/F Sensor 1
DTC Logic
DTC DETECTION LOGIC
DTC No.
CONSULT screen terms
(Trouble diagnosis content)
DTC detecting condition
Possible Cause
P2096
POST CAT FUEL TRIM SYS B1
(Post catalyst fuel trim system
too lean bank 1)
The output voltage computed by ECM from the
A/F ...
U1001 can comm circuit
Description
CAN (Controller Area Network) is a serial communication line for real time
application. It is an on-vehicle multiplex
communication line with high data communication speed and excellent error
detection ability. Many electronic
control units are equipped onto a vehicle, and each co ...
