Nissan Sentra Service Manual: Rear combination lamp
Exploded view

- Rear combination lamp
- Rear turn signal lamp bulb
- Rear turn signal lamp socket
- LED lamp harness connector
- Rear combination lamp harness connector
- Back-up lamp bulb socket
- Back-up lamp bulb
Removal and installation
Removal
- Partially remove trunk side finisher. Refer to INT-43, "TRUNK SIDE FINISHER : Removal and Installation".
- Remove the rear combination lamp nuts (B).
- Disconnect the harness connector (A) from the rear combination lamp.
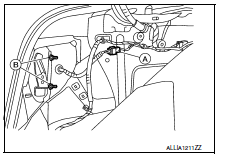
- Pull the rear combination lamp rearward and remove.
Installation
Installation is the reverse order of removal.
Bulb replacement
WARNING:
Do not touch bulb while it is lit or right after being turned off. Burning may result.
CAUTION:
- Do not touch glass surface of the bulb with bare hands or allow oil or grease to get on it to prevent damage to bulb.
- Do not leave the bulb out of the lamp reflector for a long time
because dust, moisture, smoke, etc.
may affect the performance of the lamp.
REAR TURN SIGNAL LAMP BULB
Removal
- Remove the rear combination lamp. Refer to EXL-126, "Removal and Installation".
- Rotate the rear turn signal lamp bulb socket counterclockwise and remove.
- Remove the rear turn signal lamp bulb from bulb socket.
Installation
Installation is in the reverse order of removal.
CAUTION:
After installing, be sure to install the bulb socket securely to ensure watertightness
STOP/TAIL LAMP
The stop/tail lamp is integrated into the rear combination lamp and is serviced as an assembly. Refer to EXL- 126, "Removal and Installation".
BACK-UP LAMP BULB
Removal
- Remove the rear combination lamp. Refer to EXL-126, "Removal and Installation".
- Rotate the back-up lamp bulb socket counterclockwise and remove.
- Remove the back-up lamp bulb from bulb socket.
Installation
Installation is in the reverse order of removal.
CAUTION:
After installing, be sure to install the bulb socket securely to ensure watertightness.
 License plate lamp
Removal and Installation
REMOVAL
Remove the license lamp finisher. Refer to EXT-44, "Removal and
Installation".
Disconnect the harness connector (A) from the license plate
lamp ( ...
 Combination switch
Exploded view
Combination switch
Combination switch harness connector
Front
NOTE:
Shown with the steering wheel removed for clarity only.
Removal and installation
REMOVAL
CAUTION:
...
Other materials:
System description
Component parts
Nissan vehicle immobilizer system-nats
Nissan vehicle immobilizer systemnats
: component parts location
Bcm
(view with instrument panel removed)
Dongle unit (canada only)
(behind instrument panel lh)
Ignition switch
Nats antenna amp.
(Inside steering column) ...
Wiper and washer fuse
Description
Diagnosis procedure
1. Check fuses
Check that the following fuses are not blown.
Is the fuse blown?
Yes >> replace the blown fuse after repairing the affected circuit.
No >> inspection end. ...
P0014 EVT control
DTC Logic
DTC DETECTION LOGIC
NOTE:
If DTC P0014 is displayed with DTC P0078, first perform trouble
diagnosis for DTC P0078. Refer to
EC-183, "DTC Logic".
If DTC P0014 is displayed with P1078, first perform trouble diagnosis
for P1078. Refer to EC-359,
"DTC Logic&quo ...
