
Nissan Sentra Service Manual: Intake manifold
Exploded View
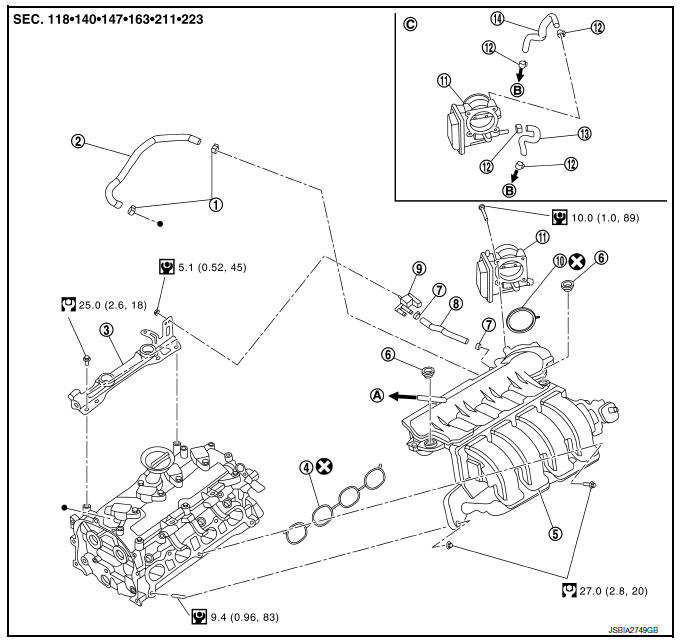
- Clamp
- PCV hose
- Bracket
- Intake manifold gasket
- Intake manifold
- Mount rubber
- Clamp
- EVAP hose
- EVAP canister purge volume control solenoid valve
- Electric throttle control actuator gasket
- Electric throttle control actuator
- Clamp
- Water hose
- Water hose
- To brake booster
- To water outlet
- Electric throttle control actuator exploded view
Removal and Installation
NOTE:
When removing components such as hoses, tubes/lines, etc., cap or plug openings to prevent fluid from spilling.
REMOVAL
- Remove engine room cover. Refer to EM-46, "Exploded View".
- Remove air cleaner body. Refer to EM-25, "Exploded View".
- Disconnect the radiator hose (upper) from the water outlet. Refer to CO-15, "Exploded View".
- Disconnect water hoses from electric throttle control actuator
- Disconnect electric throttle control actuator harness connector.
- Remove electric throttle control actuator.
CAUTION:
- Handle carefully to avoid any shock to electric throttle control actuator.
- Do not disassemble electric throttle control actuator.
- Pull out oil level gauge.
CAUTION:
Cover the oil level gauge guide openings to avoid entry of foreign materials.
- Disconnect vacuum hose and EVAP hose from intake manifold.
- Disconnect PCV hose from intake manifold.
- Disconnect harness connectors from the runner control valve, runner control valve position sensor, and the tuning valve.
- Loosen intake manifold nuts and bolts in the reverse order as shown.
 : Engine front
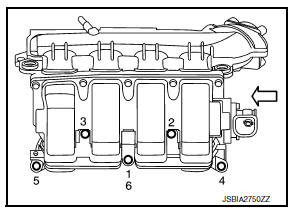
NOTE:
Disregard the numerical order No.6 in removal.
CAUTION:
Cover engine openings to avoid entry of foreign materials.
- Remove intake manifold and intake manifold gasket.
INSTALLATION
Installation is in the reverse order of removal.
Intake Manifold
- Securely install intake manifold gasket to the mounting groove of the intake manifold.
CAUTION:
Do not reuse intake manifold gasket.
- Install intake manifold with the following procedure:
- Tighten intake manifold nuts and bolts in the numerical order as shown.
- Tighten No. 1 bolt again.
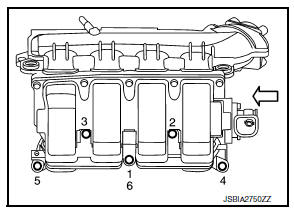
- Tighten bolts of electric throttle control actuator equally and diagonally in several steps.
NOTE:
After installation, it is necessary to re-calibrate the electric throttle control actuator as follows:
- Perform “Throttle Valve Closed Position Learning” after repair when removing harness connector of the electric throttle control actuator. Refer to EC-139, "Description".
- Perform “Idle Air Volume Learning” after repair when replacing electric throttle control actuator. Refer to EC- 140, "Description".
INSPECTION AFTER INSTALLATION
Check for engine oil leaks and engine coolant leaks with engine at operating temperature and running at idle.
WARNING:
Do not touch engine immediately after stopping as engine is extremely hot.
 Air cleaner and air duct
Exploded View
Mass air flow sensor
Mass air flow gasket
Clamp
Air duct (suction side)
Resonator
Clamp
PCV hose
Clamp
Clamp
Air cleaner cover
Mounting rubber
Air cleaner f ...
 Exhaust manifold
Exploded View
CALIFORNIA
Air fuel ratio sensor
Exhaust manifold heat shield (upper)
Exhaust manifold and three way catalyst
Exhaust manifold heat shield (rear)
Exhaust manifold heat ...
Other materials:
Rear power window switch
Removal and Installation
REMOVAL
Release the pawls using a suitable tool and lift the rear power window
switch and finisher as an assembly
and remove
Disconnect the harness connector from the rear power window switch.
Release the pawl (one on each side) using a suitable tool, then
se ...
Heater operation
This mode is used to direct heated air to the foot
outlets. Some air also flows from the defrost
outlets and the side vent outlets.
Press the button to the OFF
position
for normal heating.
Press the air flow control
button.
Turn the fan control dial to the desired position.
Tur ...
C1708, C1709, C1710, C1711 Transmitter (no data)
DTC Logic
NOTE:
The Signal Tech II Tool (J-50190) can be used to perform the following
functions. Refer to the Signal Tech II
User Guide for additional information.
Activate and display TPMS transmitter IDs
Display tire pressure reported by the TPMS transmitter
Read TPMS DTCs
Registe ...
