Nissan Sentra Service Manual: Front seat belt
Exploded View
- D-ring anchor
- Seat belt height adjuster cover
- Seat belt buckle
- Seat belt retractor
- Seat belt height adjuster
- Lap belt pre-tensioner harness connector
- Shoulder belt pre-tensioner harness connector
 Front
Front
NOTE:
LH side shown; RH side similar.
Removal and Installation
SEAT BELT RETRACTOR
Removal
CAUTION:
Before servicing the SRS, turn the ignition switch off, disconnect both battery terminals and wait at least three minutes.
- Disconnect both the negative and positive battery terminals, then wait at least three minutes. Refer to PG- 50, "Removal and Installation (Battery)".
- Slide the front seat to the full forward position.
- Remove the center pillar lower finisher. Refer to INT-27, "CENTER PILLAR LOWER FINISHER : Removal and Installation".
- Release the floor trim hold downs (1) and pull floor trim back.
(B): Lap belt pre-tensioner anchor bolt
- Disconnect the harness connector (A) from the lap belt pre-tensioner.
CAUTION:
- For removing/installing the lap belt pre-tensioner harness connector, insert a thin screwdriver wrapped in tape into the notch, then lift the lock and remove the harness connector as shown.
- Install the harness connector with the lock raised, and push the lock into the harness connector as shown.
- After installing the harness connector, check that the lock is pushed in securely.
- Remove the lap belt pre-tensioner anchor bolt.
- Remove the seat belt height adjuster cover, then remove D-ring anchor bolt.
- Disconnect the harness connector from the shoulder belt pre-tensioner
CAUTION:
- For removing/installing the shoulder belt pre-tensioner harness connector, insert a thin screwdriver wrapped in tape into the notch, then lift the lock and remove the harness connector as shown.
- Install the harness connector with the lock raised, and push the lock into the harness connector as shown.
- After installing the harness connector, check that the lock is pushed in securely.
- Remove the seat belt retractor anchor bolt and upper bolt, then remove the seat belt retractor.
Installation
Installation is in the reverse order of removal.
- Install the seat belt retractor upper bolt first.
- Make sure the seat belt height adjuster is locked in the lowest position during installation.
- Tighten the seat belt retractor bolts to specification. Refer to SB-8, "Exploded View".
- Make sure both the D-ring anchor and seat belt height adjuster operate freely.
- Always perform an inspection after repair to be sure the system is functioning within specifications. Refer to SB-5, "Inspection".
SEAT BELT HEIGHT ADJUSTER
Removal
- Remove the center pillar upper finisher. Refer to INT-28, "CENTER PILLAR UPPER FINISHER : Removal and Installation".
- Remove the D-ring anchor bolt.
- Remove the seat belt height adjuster bolts and the seat belt height adjuster.
Installation
Installation is in the reverse order of removal.
- Make sure that the seat belt height adjuster is locked in the lowest position during installation.
- Make sure both the D-ring anchor and seat belt height adjuster operate freely.
- Tighten the D-ring anchor bolt and seat belt height adjuster bolts to specification. Refer to SB-8, "Exploded View".
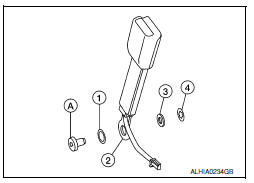
SEAT BELT BUCKLE
Removal
- Remove the front seat assembly. Refer to SE-18, "DRIVER SIDE : Removal and Installation - Seat Assembly" (front seat driver side) or SE-20, "PASSENGER SIDE : Removal and Installation - Seat Assembly" (front seat passenger side).
- Disconnect the harness connector from the seat belt buckle.
- Remove the seat belt buckle anchor bolt and the seat belt buckle.
Installation
Installation is in the reverse order of removal.
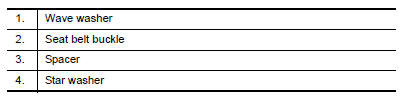
- During installation, make sure the seat belt buckle anchor bolt (A) is inserted through the components in the following order:
- Tighten the seat belt buckle anchor bolt to specification. Refer to SB-8, "Exploded View".

 Rear seat belt
Exploded View - Seat Belt Retractor
Seat belt retractor (RH)
Seat belt retractor (center)
Seat belt retractor (LH)
Front
Removal and Installation - Seat Belt Retractor
REMOVAL
R ...
Other materials:
Refrigerant
Description
CONNECTION OF SERVICE TOOLS AND EQUIPMENT
Shut-off valve
A/C service valve
Recovery/recycling/recharging
equipment
Refrigerant container (HFC-134a)
Weight scale (J-39650)
Vacuum pump (J-39649)
Manifold gauge set (J-39183)
Preferred (best) method
Alternativ ...
Electric ignition system
ELECTRIC IGNITION SYSTEM : System Description
SYSTEM DIAGRAM
*1: CVT models
*2: M/T models
Input/output signal chart
Sensor
Input Signal to ECM
ECM function
Actuator
Crankshaft position sensor (POS)
Engine speed*3
Piston position
Ignition ...
Oil seal
Valve oil seal : Removal and Installation
REMOVAL
Rotate crankshaft, and set piston whose valve oil seal is to be removed
to TDC. This will prevent valve
from dropping into cylinder.
CAUTION:
When rotating crankshaft, be careful to avoid scarring front cover with
timing chain.
Re ...
