
Nissan Sentra Service Manual: Refrigerant
Description
CONNECTION OF SERVICE TOOLS AND EQUIPMENT
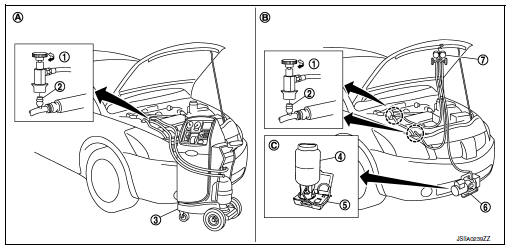
- Shut-off valve
- A/C service valve
- Recovery/recycling/recharging equipment
- Refrigerant container (HFC-134a)
- Weight scale (J-39650)
- Vacuum pump (J-39649)
- Manifold gauge set (J-39183)
- Preferred (best) method
- Alternative method
- For charging
Leak test
CHECK REFRIGERANT LEAKAGE USING FLUORESCENT LEAK DETECTION DYE
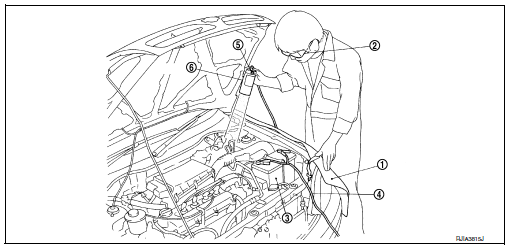
- Install a fender cover (1).
- Wear UV safety goggles (2) provided with refrigerant dye leak detection kit (J-43926).
- Connect power cable (4) of UV lamp (6) to positive and negative terminals of the battery (3).
- Press UV lamp switch (5) and check A/C system for refrigerant leakage. (Where refrigerant leakage occurs, fluorescent leak detection dye appears in green color.)
WARNING:
Do not look directly into UV lamp light source.
NOTE:
- For continuous operating time of UV lamp, follow the manufacturer operating instructions.
- Illuminate piping joints from different angles using UV lamp and check that there is no leakage.
- Use a mirror in area that is difficult to see to check refrigerant leakage.
- Refrigerant leakage from evaporator can be detected by soaking cotton swab or a similar material with drain hose water and illuminating it using UV lamp.
- Dust, dirt and packing materials adhesive used for condenser,
evaporator, and other locations may fluoresce.
Be careful not to misidentify leakage.
- Repair or replace parts where refrigerant leakage occurs and wipe off fluorescent leak detection dye.
NOTE:
Completely wipe off fluorescent leak detection dye from gaps between parts, screw threads, and others using a cotton swab or similar materials.
- Use a UV lamp to check that no fluorescent leak detection dye remains after finishing work.
WARNING:
Do not look directly into UV lamp light source.
NOTE:
- For continuous operating time of UV lamp, follow the manufacturer operating instructions.
- Dust, dirt, and packing materials adhesive used for condenser,
evaporator, and other locations may fluoresce.
Be careful not to misidentify leakage
CHECK REFRIGERANT LEAKAGE USING ELECTRICAL LEAK DETECTOR
WARNING:
Do not check refrigerant leakage while the engine is running.
CAUTION:
Be careful of the following items so that inaccurate checks or misidentifications are avoided.
- Do not allow refrigerant vapor, shop chemical vapors, cigarette smoke or others around the vehicle.
- Always check refrigerant leakage in a low air flow environment so that refrigerant may not disperse when leakage occurs.
- Stop the engine.
- Connect recovery/recycling/recharging equipment or manifold gauge set (J-39183-C) to A/C service valve.
- Check that A/C refrigerant pressure is 345 kPa (3.52 kg/cm2, 50 psi) or more when temperature is 16В°C (61В°F) or more. When pressure is lower than the specified value, recycle refrigerant completely and fill refrigerant to the specified level.
NOTE:
Leakages may not be detected if A/C refrigerant pressure is 345 kPa (3.52 kg/cm2, 50 psi) or less when temperature is less than 16В°C (61В°F).
- Clean area where refrigerant leakage check is performed and check refrigerant leakage along all surfaces of pipe connections and A/C system components using electrical leak detector (J-41995) probe.
CAUTION:
- Continue checking when a leakage is found. Always continue and complete checking along all pipe connections and A/C system components for additional leakage.
- When a leakage is detected, clean leakage area using compressed air and check again.
- When checking leakage of cooling unit inside, always clean inside of drain hose so that the probe surface may not be exposed to water or dirt.
NOTE:
- Always check leakage starting from high-pressure side and continue to low-pressure side.
- When checking leakage of cooling unit inside, operate blower fan motor for 15 minutes or more at the maximum fan speed while the engine is stopped, and then insert electrical leak detector probe into drain hose and hold for 10 minutes or more
- When disconnecting shut-off valve that is connected to A/C service valve, always evacuate remaining refrigerant so that misidentification can be avoided.
- Repair or replace parts where refrigerant leakage is detected. (Leakage is detected but leakage area is unknown.)
- Start the engine and set A/C control in the following conditions.
- A/C switch ON
- Air flow: VENT (ventilation)
- Intake door position: Recirculation
- Temperature setting: Full cold
- Fan (blower) speed: Maximum speed set
- Run the engine at approximately 1,500 rpm for 2 minutes or more.
- Stop the engine. Check again for refrigerant leakage. Go to step 4.
WARNING:
Be careful not to get burned when the engine is hot.
NOTE:
- Start refrigerant leakage check immediately after the engine is stopped.
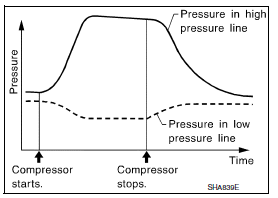
- When refrigerant circulation is stopped, pressure on the lowpressure side rises gradually, and after this, pressure on the high-pressure side falls gradually.
- The higher the pressure is, the easier it is to find the refrigerant leakage.
Recycle refrigerant
WARNING:
- Always use HFC-134a for A/C refrigerant. If CFC-12 is accidentally charged, compressor is damaged due to insufficient lubrication.
- Always observe and follow precautions described on refrigerant container. Incorrect handling may result in an explosion of refrigerant container, frostbite or the loss of eyesight.
- Do not breathe A/C refrigerant and oil vapor or mist. Exposure may irritate eyes, nose, or throat.
- Do not allow HFC-134a to be exposed to an open flame or others because it generates poisonous gas when in contact with high temperature objects. Keep workshop well ventilated.
- Perform oil return operation. Refer to HA-25, "Perform Oil Return Operation". (If refrigerant or oil leakage is detected in a large amount, omit this step, and go to step 2.)
CAUTION:
Do not perform oil return operation if a large amount of refrigerant or oil leakage is detected.
- Check gauge pressure readings of recovery/recycling/recharging equipment. When remaining pressure exists, recycle refrigerant from high-pressure hose and low-pressure hose.
NOTE:
Follow manufacturer instructions for the handling or maintenance of the equipment. Do not fill the equipment with non-specified refrigerant.
- Remove A/C service valve cap from the vehicle.
- Connect recovery/recycling/recharging equipment to A/C service valve.
- Operate recovery/recycling/recharging equipment, and recycle refrigerant from the vehicle.
- Evacuate air for 10 minutes or more to remove any remaining refrigerant integrated to compressor oil, etc.
- Refrigerant recycle operation is complete.
Charge refrigerant
WARNING:
- Always use HFC-134a for A/C refrigerant. If CFC-12 is accidentally charged, compressor is damaged due to insufficient lubrication.
- Always observe and follow precautions described on refrigerant container. Incorrect handling may result in an explosion of refrigerant container, frostbite, or the loss of eyesight.
- Do not breathe A/C refrigerant and oil vapor or mist. Exposure my irritate eyes, nose, or throat.
- Do not allow HFC-134a to be exposed to an open flame or others because it generates poisonous gas when in contact with high temperature objects. Keep workshop well ventilated.
- Connect recovery/recycling/recharging equipment to the A/C service valve.
- Operate recovery/recycling/recharging equipment, and evacuate air from A/C system for 25 minutes or more.
CAUTION:
Evacuate air for 15 minutes or more if the parts are replaced.
- Check the airtightness of A/C system for 25 minutes or more. If pressure
raises more than the specified
level, charge A/C system with approximately 200g refrigerant and check that
there is no refrigerant leakage.
Refer to HA-21, "Leak Test".
CAUTION:
Check the airtightness for 15 minutes or more if the parts are replaced.
- If parts other than compressor are replaced, fill compressor oil according to parts that are replaced.
- Charge the specified amount of refrigerant to A/C system.
- Check that A/C system operates normally.
- Disconnect recovery/recycling/recharging equipment. (Collect the refrigerant from the high-pressure hose and low-pressure hose of recovery/recycling/recharging equipment.)
- Install A/C service valve cap.
- Refrigerant charge is complete.

 OIL
Description
MAINTENANCE OF OIL LEVEL
The compressor oil is circulating in the system together with the
refrigerant. It is necessary to fill compressor
with oil when replacing A/C system parts or ...
Other materials:
Diagnosis system (combination meter)
Description
COMBINATION METER SELF-DIAGNOSIS MODE
The information display, speedometer and tachometer can be checked in
self-diagnosis mode.
STARTING COMBINATION METER SELF-DIAGNOSIS MODE
NOTE:
Check combination meter power supply and ground circuits if
self-diagnosis mode does not star ...
P2122, P2123 APP Sensor
DTC Logic
DTC DETECTION LOGIC
NOTE:
If DTC P2122 or P2123 is displayed with DTC P0643, first perform the
trouble diagnosis for DTC P0643.
Refer to EC-353, "DTC Logic".
DTC No.
CONSULT screen terms
(Trouble diagnosis content)
DTC detecting condition
Possible caus ...
VDC OFF Indicator lamp
Description
Component Function Check
1.CHECK VDC OFF INDICATOR LAMP FUNCTION
Check that VDC OFF indicator lamp in combination meter turns ON
for approximately 2 seconds after ignition
switch is turned ON.
Is the inspection result normal?
YES >> Inspection End.
NO >> Proc ...
