
Nissan Sentra Service Manual: Front drive shaft boot
Exploded View
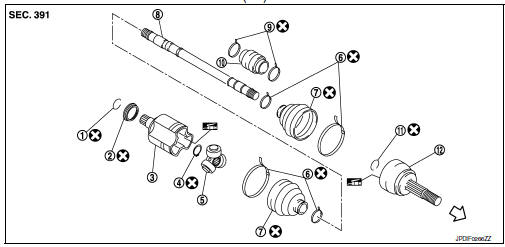
(LH)
- Circular clip
- Dust shield
- Slide joint housing
- Snap ring
- Spider assembly
- Boot band
- Boot
- Shaft
- Damper band
- Dynamic damper
- Circular clip
- Joint sub-assembly
 Wheel side
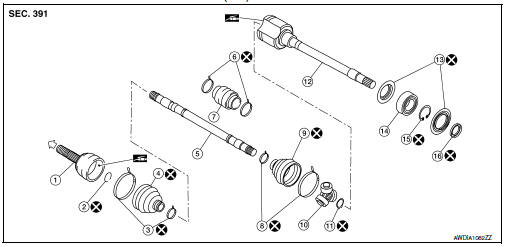
(RH) 6M/T
- Joint sub-assembly
- Circular clip
- Boot band
- Boot
- Shaft
- Damper band
- Dynamic damper
- Boot band
- Boot
- Spider assembly
- Snap ring
- Slide joint housing
- Dust shield
- Support bearing
- Snap ring
- Dust shield
 Wheel side
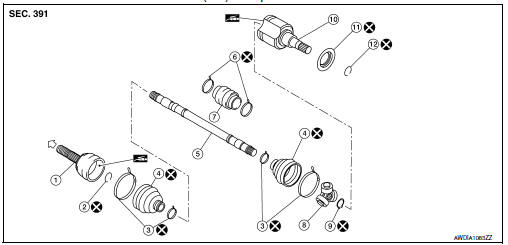
(RH) Except 6M/T
- Joint sub-assembly
- Circular clip
- Boot band
- Boot
- Shaft
- Damper band
- Dynamic damper
- Spider assembly
- Snap ring
- Slide joint housing
- Dust shield
- Circular clip
 Wheel side
 Front wheel hub
Exploded View
Steering knuckle
Splash guard
Wheel stud
Wheel hub and bearing
Disc brake rotor
Wheel hub lock nut
Nut retainer
Cotter pin
Removal and Installation
Remove t ...
 Wheel side
WHEEL SIDE : Removal and Installation
REMOVAL
Remove the wheel and tire using power tool. Refer to WT-47, "Exploded
View".
Remove the brake caliper torque member bolts, leaving the ...
Other materials:
The oil pressure warning lamp does not turn on
Description
The oil pressure warning lamp stays off when the ignition switch is turned
on.
Diagnosis procedure
1.Check combination meter oil pressure warning light
Select METER/M&A on CONSULT.
Observe oil w/l data monitor while operating the ignition switch.
Is the inspection r ...
A-bag branch line circuit
Diagnosis procedure
Warning:
Always observe the following items for preventing accidental
activation.
Before servicing, turn ignition switch off, disconnect battery
negative terminal, and wait 3 minutes
or more. (To discharge backup capacitor.)
Never use unspecified tester or other me ...
Map lamp
Removal and installation
Removal
Lower front edge of map lamp (1) down from the headlining by
releasing the metal clips, then slide forward to clear pawls at
rear.
: Metal clip
Pawl
Disconnect the harness connectors from the map lamp and remove.
Installation
Installation is in t ...
