Nissan Sentra Service Manual: Door mirror
Exploded view
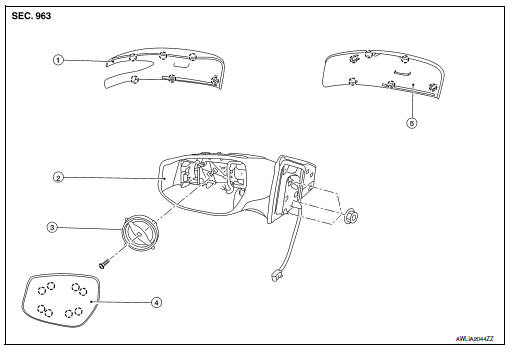
- Door mirror cover (with side turn signal lamp)
- Door mirror housing
- Door mirror actuator
- Glass mirror
- Door mirror cover (without side turn signal lamp)
 : Pawl
Door mirror assembly
Door mirror assembly : removal and installation
Removal
Caution:
Be careful not to scratch or damage the door mirror body when removing.
- Remove front door finisher. Refer to int-15, "removal and installation".
- Disconnect door mirror harness connector.
- Remove door mirror nuts and the door mirror assembly.
Installation
Installation is in the reverse order of removal.
Glass mirror
Glass mirror : removal and installation
Removal
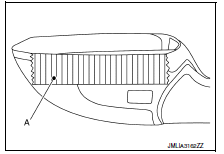
- Put a strip of protective tape (A) on housing assembly.
- Insert a suitable tool (a) into the recess at lower side between glass mirror (1) and actuator (2), and push up pawls to remove glass mirror lower side in the order shown.
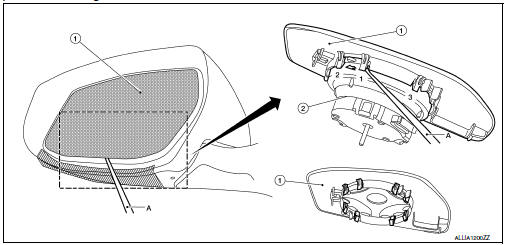
- Insert a suitable tool at (LH and RH) side between glass mirror and actuator, and push up pawls to remove glass mirror (LH and RH) side.
- Disconnect door glass mirror heater harness connectors (if equipped).
- Remove door glass mirror.
Installation
Installation is in the reverse order of removal.
Caution:
After installation, visually check that pawls are securely engaged.
Door mirror cover
Door mirror cover : removal and installation
Removal
Note:
With side turn signal lamp shown, without is similar.
- Remove door glass mirror. Refer to mir-18, "glass mirror : removal and installation".
- Using a suitable tool, disengage door mirror cover pawls to separate the door mirror cover (1) from the door mirror assembly (2).
 Pawl
Pawl
Installation
Installation is in the reverse order of removal.
Caution:
After installation, visually check that pawls are securely engaged.
 Inside mirror
Exploded view
Manual mirror
Windshield glass
Inside mirror base
Inside mirror assembly
Auto anti-dazzle mirror
Windshield glass
Inside mirror base
Harness connector
Mirr ...
 Door mirror remote control switch
Removal and Installation
Removal
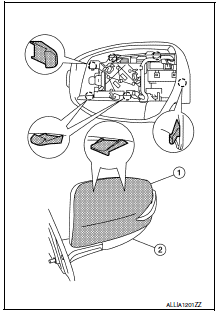
Remove the instrument finisher D. Refer to IP-14, "Exploded View".
Using suitable tool (a) release the pawls and remove the door mirror
remote cont ...
Other materials:
Small children
Children that are over 1 year old and weigh at
least 20 lbs (9 kg) should remain in a rear-facing
child restraint as long as possible up to the height
or weight limit of the child restraint. Children who
outgrow the height or weight limit of the rearfacing
child restraint and are at least 1 yea ...
Precautions
Precaution for supplemental restraint system (srs) "air bag" and "seat belt
pre-tensioner"
The supplemental restraint system such as “air bag” and “seat belt pre-tensioner”,
used along
with a front seat belt, helps to reduce the risk or severity of injur ...
Towing your vehicle
When towing your vehicle, all State (Provincial in
Canada) and local regulations for towing must be
followed. Incorrect towing equipment could damage
your vehicle. Towing instructions are available
from a NISSAN dealer. Local service operators
are generally familiar with the applicable laws
an ...
