
Nissan Sentra Service Manual: Side window glass
Components
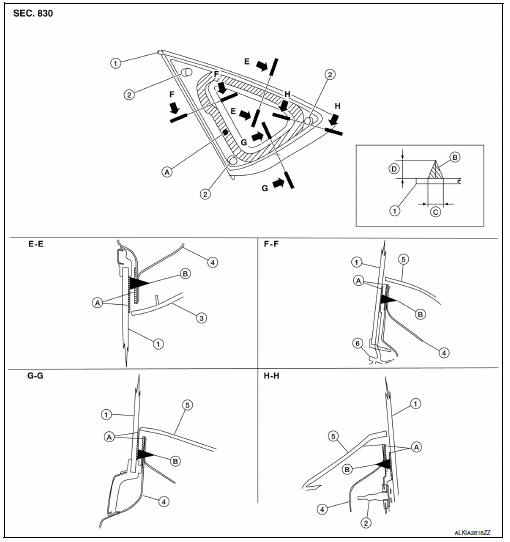
- Side window glass
- Spacer
- Headlining
- Rear body pillar
- Rear pillar finisher
- Rear door weatherstrip
- Primer area
- Adhesive
- 7 mm (0.3 in)
- 12 mm (0.5 in)
Removal and Installation
REMOVAL
- Remove the rear pillar finisher. Refer to INT-29, "REAR PILLAR FINISHER : Removal and Installation".
- After removing moldings, remove the glass using piano wire or power cutting tool (A) and an inflatable pump (B).
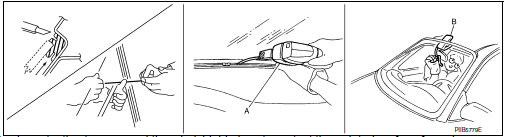
- Apply protective tape around the windshield glass to protect the painted surface from damage.
- If the windshield glass is to be reused, mark the body and the glass with matching marks.
- Minimum adhesive coating amount 8 +3,-0 g/100 mm (0.28 +0.11,-0 oz/3.9 in) all around.
- Minimum primer application area 20.0 mm (0.79 in) on body and glass side.
WARNING:
When cutting the glass from the vehicle, always wear safety glasses and heavy gloves to help prevent glass splinters from entering your eyes or cutting your hands.
CAUTION:
- Be careful not to scratch the glass when removing.
- Do not set or stand the glass on its edge. Small chips may develop into cracks.
- Apply protective tape around the windshield glass to protect the painted surface from damage.
INSTALLATION
Installation is in the reverse order of removal.
- If repainting near the rear window glass flange area, protect the flange adhesion area by masking the flange.
- Use a genuine NISSAN Urethane Adhesive Kit (if available) or equivalent and follow the instructions furnished with it.
- Adhesive shall be continuously applied to assure watertightness. Glass installation shall be finished within five minutes after applying the adhesive.
- The start and finish of the urethane adhesive application should be located at the bottom to assure watertightness.
- While the urethane adhesive is curing, open a door window. This will prevent the glass from being forced out by passenger compartment air pressure when a door is closed.
- Inform the customer that the vehicle should remain stationary until the urethane adhesive has completely cured (preferably 24 hours). Curing time varies with temperature and humidity.
WARNING:
- Keep heat and open flames away as primers and adhesive are flammable.
- The materials contained in the kit are harmful if swallowed, and may irritate skin and eyes. Avoid contact with the skin and eyes.
- Use in an open, well ventilated location. Avoid breathing the
vapors. They can be harmful if inhaled.
If affected by vapor inhalation, immediately move to an area with fresh air.
- Driving the vehicle before the urethane adhesive has completely cured may affect the performance of the side window glass in case of an accident.
CAUTION:
- Do not use an adhesive which is past its usable term. Shelf life of this product is limited to six months after the date of manufacture. Carefully adhere to the expiration or manufacture date printed on the box or product.
- Keep primers and adhesive in a cool, dry place. Ideally, they should be stored in a refrigerator.
- Do not leave primers or adhesive cartridge unattended with their caps open or off.
- The vehicle should not be driven for at least 24 hours or until the urethane adhesive has completely cured. Curing time varies depending on temperature and humidity. The curing time will increase under lower temperature and lower humidity.
REPAIRING WATER LEAKS FOR SIDE WINDOW GLASS
- Leaks can be repaired without removing and reinstalling glass.
- If water is leaking between the urethane adhesive material and body or glass, determine the extent of leakage.
- This can be done by applying water to the side window area while pushing glass outward.
- To stop the leak, apply primer (if necessary) and then urethane adhesive to the leak point.
 Rear power window motor
Removal and Installation
REMOVAL
Remove the rear door glass regulator (1). Refer to GW-21,
"Removal and Installation"
Remove the screws and the rear power window motor (2).
I ...
 Rear window glass
Exploded View
Rear window glass
Spacer
Rubber dam
Body side outer
Headlining
Roof panel
Trunk lid
Adhesive
12 mm (0.5 in)
7 mm (0.3 in)
2.0 mm (0.08 in)
3 mm (0.1 in) ...
Other materials:
C1609 Vehicle speed signal
DTC Logic
Dtc detection logic
DTC
Display item
Malfunction detected condition
Possible cause
C1609
CAN VHCL SPEED
Malfunction is detected in vehicle speed signal that
is output from abs actuator and electric unit (control
unit) via can communication. ...
Bluetooth® settings
To access the phone settings:
Press the [ ] button.
Touch the “Settings� key.
Touch the “Phone & Bluetooth� key.
Menu Item
Result
Phone Settings
See “Phone settings� in this section for more information.
Connect New Device
Touch to co ...
Air cleaner filter
Exploded View
Mass air flow sensor
Mass air flow gasket
Clamp
Air duct (suction side)
Resonator
Clamp
PCV hose
Clamp
Clamp
Air cleaner cover
Mounting rubber
Air cleaner filter
Air cleaner body
Air duct inlet (lower)
Air duct inlet (upper)
Grommet
Bracket
Gro ...
