
Nissan Sentra Service Manual: Removal and installation
Bcm (body control module)
Removal and Installation
Note:
Before replacing bcm, perform “read configuration” to save or print current vehicle specification. Refer to bcs-116, "configuration (bcm) : description".
Removal
- Disconnect the negative battery terminal. Refer to pg-52, "removal and installation".
- Remove instrument lower panel lh and instrument side finisher lh. Refer to ip-21, "removal and installation".
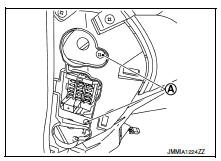
- Remove fuse block (j/b) screws (a) and position (bcm) aside.
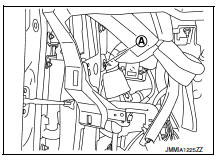
- Remove harness clip (A).
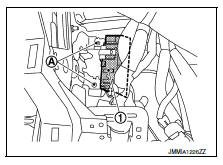
- Remove the screws (A) from the BCM (1).
- Disconnect the harness connectors and remove the bcm.
Installation
Installation is in the reverse order of removal.
Caution:
- Perform “configuration (bcm)” when replacing bcm. Refer to bcs-116, "configuration (bcm) : description"
- Be sure to perform the system initialization (nats) when replacing bcm. Refer to bcs-115, "additional service when replacing control unit (bcm) : work procedure".
- When replacing bcm, if new bcm does not come with keyfobs attached, all existing keyfobs must be re-registered.
Combination switch
Exploded view
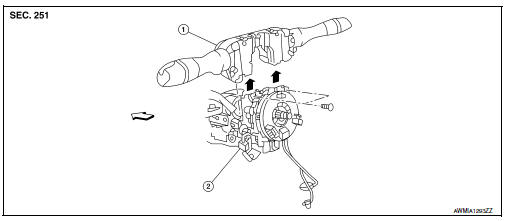
- Combination switch
- Combination switch harness connector
 Front
Front
Note:
Shown with the steering wheel removed for clarity only.
Removal and installation
Removal
Caution:
- Before servicing, turn the ignition switch off, disconnect both battery terminals and wait at least three minutes.
- Do not use air or electric tools when removing or installing the combination switch.
- Disconnect both the negative and positive battery terminals, then wait at least three minutes. Refer to PG- 50, "Removal and Installation (Battery)".
- Remove the steering column covers. Refer to ip-16, "removal and installation".
- Rotate steering wheel clockwise to access first combination switch bolt and remove.
- Rotate steering wheel counter-clockwise to access second combination switch bolt and remove.
- Disconnect the harness connector from the combination switch and remove.
Installation
Installation is in the reverse order of removal.
Caution:
- After the work is completed, make sure no system malfunction is detected by air bag warning lamp.
- In case a malfunction is detected by the air bag warning lamp, reset with the self-diagnosis function and delete the memory with consult.
- If a malfunction is still detected after the above operation,
perform self-diagnosis to repair malfunctions.
Refer to src-41, "additional service when replacing control unit : special repair requirement".
 Symptom diagnosis
Combination switch system symptoms
Symptom Table
Perform the data monitor of consult to check for any malfunctioning
item.
Check the malfunction combinations.
Identify the malfunct ...
 Lan system
...
Other materials:
P1650 Starter motor relay 2
Description
ECM controls ON/OFF state of the starter relay, according to the engine and
vehicle condition. ECM transmits
a control signal to IPDM E/R via BCM by CAN communication.
Under normal conditions, ECM controls and maintains the starter relay in OFF
state during following condition:
...
Specifications
Engine
This spark ignition system complies with the Canadian standard ICES-002.
Wheels and tires
Dimensions and weights
...
Hvac branch line circuit
Diagnosis procedure
1.Check connector
Turn the ignition switch off.
Disconnect the battery cable from the negative terminal.
Check the terminals and connectors of the a/c auto amp. For damage, bend
and loose connection (unit
side and connector side).
Is the inspection result normal? ...
