
Nissan Sentra Service Manual: Rear seat
Exploded View
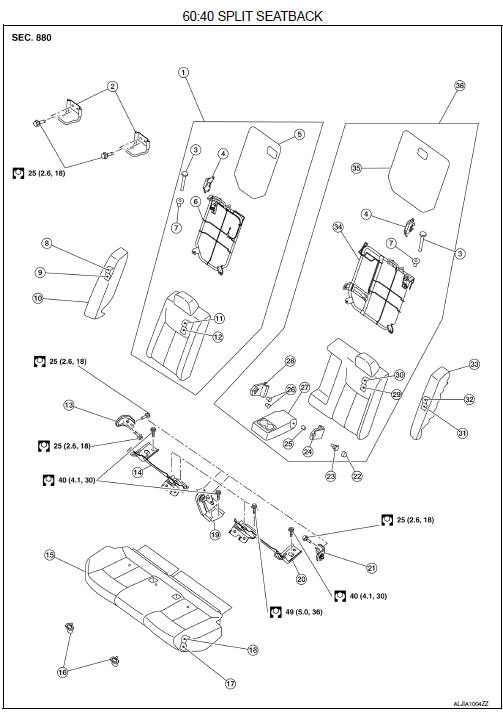
- Rear seatback assembly (RH)
- Seatback striker
- Seatback latch release knob
- Seatback latch assembly
- Seatback silencer (RH)
- Rear seatback frame (RH)
- Seatback latch release knob finisher
- Rear seat bolster trim (RH)
- Rear seat bolster pad (RH)
- Rear seat bolster (RH)
- Seatback trim (RH)
- Seatback pad (RH)
- Seatback hinge bracket (RH)
- LATCH bracket (RH)
- Seat cushion assembly
- Seat cushion hook
- Seat cushion pad
- Seat cushion trim
- Seatback hinge bracket (center)
- LATCH bracket (LH)
- Seatback hinge bracket (LH)
- Armrest pivot bolt finisher
- Armrest pivot bolt
- Armrest hinge bracket
- Armrest bushing (LH)
- Armrest bushing (RH)
- Armrest assembly
- Armrest hinge finisher
- Seatback pad (LH)
- Seatback trim (LH)
- Rear seat bolster pad (LH)
- Rear seat bolster trim (LH)
- Rear seat bolster (LH)
- Rear seatback frame (LH)
- Seatback silencer (LH)
- Rear seatback assembly (LH)
Removal and Installation - Seat Cushion Assembly
REMOVAL
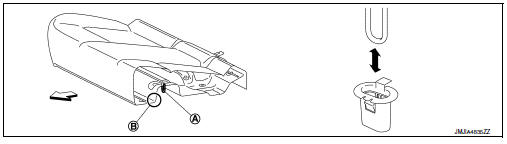
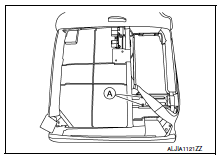
- Lift up the seat cushion assembly close to the front edge (B) to release it from the seat cushion hooks (A) (one for each side) and remove the seat cushion assembly.
 Front
INSTALLATION
Installation is in the reverse order of removal.
Removal and Installation - 60:40 Split Seatback
REMOVAL
- Place the rear seatback assembly in the folded down position.
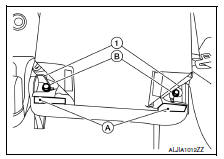
- Release the hook fasteners (A) in the lower corners of the rear seatback assembly.
- Remove the rear seatback assembly bolts (B) from the seatback hinge brackets (1), then remove the rear seatback assembly.
INSTALLATION
Installation is in the reverse order of removal.
- Tighten the rear seatback assembly bolts to specification. Refer to SE-22, "Exploded View".
Removal and Installation - Armrest Assembly
REMOVAL
- Place the rear seatback assembly (LH) in the folded down position.
- Release the J-hook retainer (A) and unzip the seatback trim zippers (B).
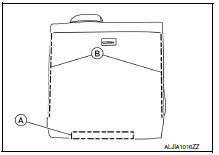
- Remove two nuts (A) and the armrest assembly.
INSTALLATION
Installation is in the reverse order of removal.
Removal and Installation - Rear Seat Bolster
REMOVAL
- Remove the seat cushion assembly. Refer to SE-23, "Removal and Installation - Seat Cushion Assembly".
- Remove the seat belt from the seat belt guide.
- Remove the bolt at bottom of rear seat bolster.
- Lift the rear seat bolster to remove.
INSTALLATION
Installation is in the reverse order of removal.
- Tighten rear seat bolster bolt to specification. Refer to SE-22, "Exploded View".
Removal and Installation - Seat Cushion Hook
REMOVAL
- Remove the seat cushion assembly. Refer to SE-23, "Removal and Installation - Seat Cushion Assembly".
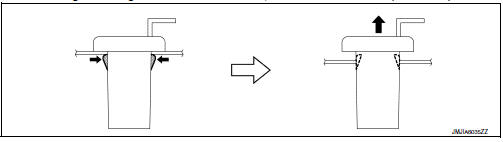
- Release the seat cushion hook pawls as shown and remove.
CAUTION:
Before removing/installing the seat cushion hook, check its orientation (front/rear).
INSTALLATION
Installation is in the reverse order of removal.
Removal and Installation - Seatback Striker
REMOVAL
- Place the rear seatback assemblies (LH/RH) in the folded down position.
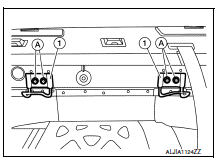
- Remove the top three clips of the rear seatback finisher and position aside to access the seatback striker bolts. Refer to INT-32, "Exploded View".
- Remove bolts (A) and the seatback strikers (1).
NOTE:
Rear seatback finisher removed for clarity.
INSTALLATION
Installation is in the reverse order of removal.
- Tighten the seatback striker bolts to specification. Refer to SE-22, "Exploded View".
Removal and Installation - Seatback Hinge Bracket
REMOVAL
- Remove the rear seatback assemblies (LH/RH). Refer to SE-23, "Removal and Installation - 60:40 Split Seatback".
- Remove the seat cushion assembly. Refer to SE-23, "Removal and Installation - Seat Cushion Assembly".
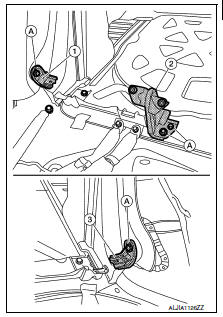
- Remove rear seatback hinge bracket bolts (A) and remove.
- Seatback hinge bracket (RH)
- Seatback hinge bracket (center)
- Seatback hinge bracket (LH)
INSTALLATION
Installation is in the reverse order of removal.
- Tighten the seatback hinge brackets to specification. Refer to SE-22, "Exploded View".
 Front seat
Driver side
DRIVER SIDE : Exploded View
Driver side
Headrest
Headrest holder (locked)
Headrest holder (free)
Seatback silencer
Seatback trim
Seatback pad
Seat belt buckle
Seat ...

Other materials:
Exterior front
Engine hood
Windshield wiper and washer switch,
Windshield
Moonroof (if so equipped)
Power windows
Door locks, keyfob, keys, NISSAN
Intelligent Key® (if so equipped)
Mirrors
Tire pressure
Flat tire
Tire chains
Replacing bulbs
Headlight and turn signal switch, LED
he ...
Servicing air conditioner (if so equipped)
The air conditioner system in your NISSAN vehicle
is charged with a refrigerant designed with
the environment in mind.
This refrigerant does not harm the earth’s
ozone layer.
Special charging equipment and lubricant is required
when servicing your NISSAN air conditioner.
Using improper re ...
M&a branch line circuit
Diagnosis procedure
1.Check connector
Turn the ignition switch off.
Disconnect the battery cable from the negative terminal.
Check the terminals and connectors of the combination meter for damage,
bend and loose connection
(unit side and connector side).
Is the inspection result nor ...
