
Nissan Sentra Service Manual: OIL PAN
Exploded View
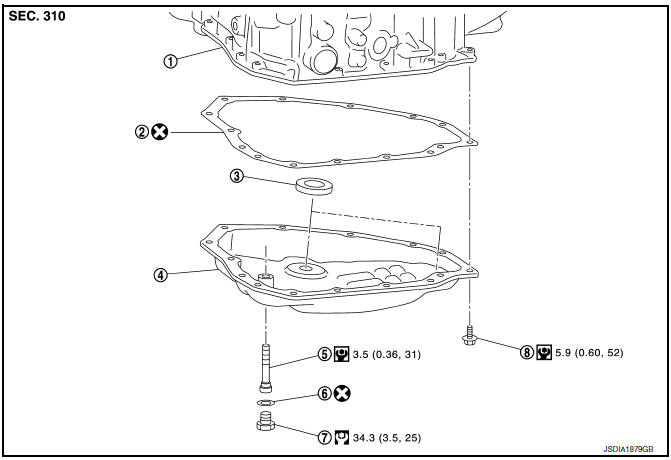
- Transaxle assembly
- Oil pan gasket
- Magnet
- Oil pan
- Overflow tube
- Drain plug gasket
- Drain plug
- Oil pan fitting bolt
 : Always replace after every
disassembly.
 : NВ·m (kg-m, ft-lb)
 : NВ·m (kg-m, it-lb)
Removal and Installation
REMOVAL
- Remove the engine under cover. Refer to EXT-31, "ENGINE UNDER COVER : Removal and Installation".
- Remove the drain plug and overflow tube, and then drain the CVT fluid.
CAUTION:
When draining CVT fluid use safety glasses.
- Remove the drain plug gasket from the drain plug.
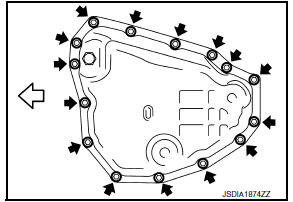
- Remove the oil pan bolts (

), and then remove the oil pan and oil pan gasket.
 : Front
- Remove the magnets from the oil pan.
INSTALLATION
Installation is in the reverse order of removal.
CAUTION:
- Do not reuse oil pan gasket and drain plug gasket.
- When installing the oil pan bolts, be sure to use new bolts.
- Completely remove all moisture, oil and old gasket, etc. from the oil pan gasket surface of transaxle case and oil pan.
- When installing the overflow tube, be sure to tighten to the specified torque. If it is not tightened to the specified torque, the tube may be damaged.
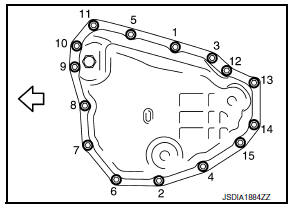
- When the oil pan is installed, tighten bolts in the order shown in the figure after temporarily tightening the oil pan bolt.
 : Front
Inspection
INSPECTION AFTER REMOVAL
Check oil pan for foreign material.
- If a large amount of worn material is found, clutch plate may be worn.
- If iron powder is found, bearings, gears, or clutch plates may be worn.
- If aluminum powder is found, bushing may be worn, or chips or burrs of aluminum casting parts may enter.
Check points where wear is found in all cases.
INSPECTION AFTER INSTALLATION
Start the engine and check visually that there is no leakage of CVT fluid.
 G Sensor
Exploded View
G sensor
Bracket
Vehicle front
NВ·m (kg-m, ft-lb)
NВ·m (kg-m, in-lb)
Removal and Installation
WARNING:
Do not leave any objects (screwdrivers, tools, etc.) on ...
 Primary speed sensor
Exploded View
Transaxle assembly
O-ring
Primary speed sensor
: Always replace after every
disassembly.
: N m (kg-m, in-lb)
: Genuine NISSAN CVT Fluid NS-3
Removal and Installat ...
Other materials:
Precaution for Work
When removing or disassembling each component, be careful not to damage
or deform it. If a component
may be subject to interference, be sure to protect it with a shop cloth.
When removing (disengaging) components with a screwdriver or similar
tool, be sure to wrap the component
with a ...
Evaporative emission system
EVAPORATIVE EMISSION SYSTEM : System Description
SYSTEM DIAGRAM
INPUT/OUTPUT SIGNAL CHART
Sensor
Input signal to ECM
ECM function
Actuator
Crankshaft position sensor (POS)
Engine speed*
EVAP canister
purge flow control
EVAP canister purge volume
control ...
Basic inspection
Diagnosis and repair workflow
Work flow
Overall sequence
Detailed flow
1.Get information for symptom
Get detailed information from the customer about the symptom (the condition
and the environment when the
incident/malfunction occurred).
>> Go to 2
2.Confirm the symptom
Try to ...
