
Nissan Sentra Service Manual: Driver side door mirror defogger
Description
Heats the heating wire with the power supply from the rear window defogger relay to prevent the door mirror from fogging up.
Component Function Check
Check that heating wire of door mirror defogger lh is heated when turning the rear window defogger switch on.
Is the inspection result normal? Yes >> door mirror defogger is ok.
No >> refer to def-35, "diagnosis procedure".
Diagnosis Procedure
Regarding wiring diagram information, refer to def-20, "wiring diagram".
1. Check power supply circuit
- Turn ignition switch OFF.
- Disconnect door mirror lh.
- Turn ignition switch on.
- Check voltage between door mirror LH connector and ground.
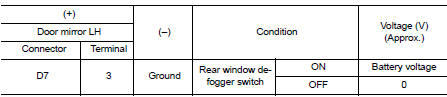
Is the inspection result normal? Yes >> go to 2.
No >> repair or replace harness.
2. Check ground circuit
- Turn ignition switch OFF.
- Check continuity between door mirror lh connector and ground.

Is the inspection result normal? Yes >> go to 3.
No >> repair or replace harness.
3. Check door mirror defogger lh
Check door mirror defogger lh.
Refer to def-36, "component inspection".
Is the inspection result normal? Yes >> go to 4.
No >> replace door mirror. Refer to mir-18, "door mirror assembly : removal and installation".
4. Check intermittent incident
Check intermittent incident.
Refer to gi-39, "intermittent incident".
Is the inspection result normal? Yes >> check the following.
- Battery power supply circuit.
- Fuse block (j/b).
No >> repair or replace the malfunctioning parts.
Component inspection
1. Check door mirror defogger lh
- Turn ignition switch off.
- Disconnect door mirror lh.
- Check continuity between door mirror terminals.

Is the inspection result normal? Yes >> inspection end.
No >> replace door mirror lh. Refer to mir-18, "door mirror assembly : removal and installation".
 Rear window defogger power supply and ground circuit
Description
Heats the heating wire with the power supply from the rear window defogger
relay to prevent the rear window
from fogging up.
Component function check
1. Check rear window defogger
...
 Passenger side door mirror defogger
Description
Heats the heating wire with the power supply from the rear window defogger
relay to prevent the door mirror
from fogging up.
Component function check
1.Check door mirror defogger rh ...
Other materials:
Bluetooth® settings
To access and adjust the settings for the
Bluetooth® Hands-Free Phone System:
Press the SETTING button.
Use the TUNE/SCROLL knob to select
“Bluetooth� and then press the ENTER button:
Bluetooth
Select “On� or “Off� to turn the vehicle’s
Bluetooth® system on or ...
System description
Component parts
Component parts location
Instrument lower finisher
Component description
Sport mode switch
The sport mode switch is installed to the instrument lower finisher.
When the sport mode indicator lamp on the combination meter
is off and the sport mode switch is pres ...
Unit disassembly and assembly
OIL PUMP
O-ring
Oil pan (upper)
Oil level gauge guide
O-ring
Oil level gauge
Oil pump chain tensioner
Oil pump drive chain
Crankshaft sprocket
Oil pump sprocket
Oil pump
Drain plug washer
Drain plug
Oil pan (lower)
Oil filter
Connector bolt
Crankshaft position s ...
