Nissan Sentra Service Manual: Passenger side door mirror defogger
Description
Heats the heating wire with the power supply from the rear window defogger relay to prevent the door mirror from fogging up.
Component function check
1.Check door mirror defogger rh
Check that the heating wire of door mirror defogger rh is heated when turning the rear window defogger switch on.
Is the inspection result normal? Yes >> door mirror defogger rh is ok.
No >> refer to def-37, "diagnosis procedure".
Diagnosis procedure
Regarding Wiring Diagram information, refer to DEF-20, "Wiring Diagram".
1. Check power supply circuit
- Turn ignition switch off
- Disconnect door mirror rh.
- Turn ignition switch on.
- Check voltage between door mirror RH connector and ground.
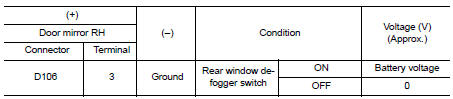
Is the inspection result normal? YES >> GO TO 2.
NO >> Repair or replace harness.
2. Check ground circuit
- Turn ignition switch off.
- Check continuity between door mirror RH connector and ground.

Is the inspection result normal? YES >> GO TO 3.
NO >> Repair or replace harness.
3. Check passenger side door mirror defogger
Check door mirror defogger rh.
Refer to def-38, "component inspection".
Is the inspection result normal? Yes >> go to 4.
No >> replace door mirror rh. Refer to mir-18, "door mirror assembly : removal and installation".
4. Check intermittent incident
Check intermittent incident.
Refer to gi-39, "intermittent incident".
Is the inspection result normal? Yes >> check the following.
- Battery power supply circuit.
- Fuse block (J/B).
No >> repair or replace the malfunctioning parts.
Component inspection
1. Check door mirror defogger rh
- Turn ignition switch off.
- Disconnect door mirror rh.
- Check continuity between door mirror terminals.

Is the inspection result normal? YES >> Inspection End.
NO >> Replace door mirror RH. Refer to MIR-18, "DOOR MIRROR ASSEMBLY : Removal and Installation".
 Driver side door mirror defogger
Description
Heats the heating wire with the power supply from the rear window defogger
relay to prevent the door mirror
from fogging up.
Component Function Check
Check that heating wire of doo ...
 Rear window defogger feedback signal
Description
Turns the indicator lamp in the rear window defogger switch ON when operating
the rear window defogger.
Component function check
1.Check rear window defogger feedback signal
Check t ...
Other materials:
Emission control system warranty
Your NISSAN vehicle is covered by the following
emission warranties:
For USA
Emission Defects Warranty
Emissions Performance Warranty
Details of this warranty may be found with other
vehicle warranties in your Warranty Information
Booklet which comes with your NISSAN vehicle.
If you ...
Service
Never use electrical test equipment to check SRS circuits unless
instructed to in this Service Manual.
Before servicing the SRS, turn power switch OFF, disconnect battery
negative terminal and wait 3 minutes
or more.
For approximately 3 minutes after the cables are removed, it is stil ...
P0603 ECM
DTC Logic
DTC DETECTION LOGIC
DTC No.
CONSULT screen terms
(Trouble diagnosis content)
DTC detecting condition
Possible cause
P0603
ECM BACK UP CIRCUIT
[Internal control module keep
alive memory (KAM) error]
Malfunction in the internal back up RAM o ...
