
Nissan Sentra Service Manual: Door handle
Front door handle
Front door handle : exploded view
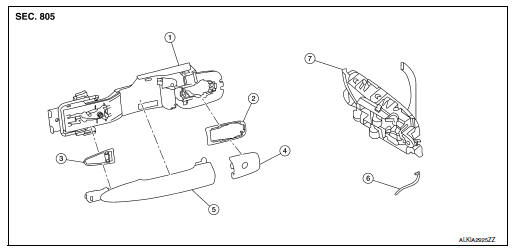
- Outside handle bracket
- Rear gasket
- Front gasket
- Outside handle escutcheon
- Outside handle
- Door key cylinder rod
- Inside handle assembly
Front door handle : removal and installation - inside handle
REMOVAL
- Remove front door finisher. Refer to INT-15, "Removal and Installation".
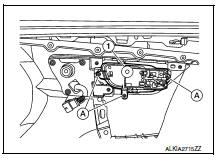
- Remove inside handle assembly screws (A) and the inside handle assembly (1).
INSTALLATION
Installation is in the reverse order of removal.
CAUTION:
- Check front door lock cables are properly engaged to inside handle.
- After installation, check front door open/close, lock/unlock operation.
Front door handle : removal and installation - outside handle
REMOVAL
- Fully close front door glass.
- Remove front door finisher. Refer to INT-15, "Removal and Installation".
- Remove front door vapor barrier.
- Remove front door glass channel rear.
- Disconnect the harness connectors from the door antenna and door request switch and then remove harness clamp on outside handle bracket.
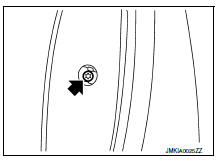
- Remove door side grommet, and loosen screw that retains the front door outside handle bracket.
- Reach in to separate door key cylinder rod (LH side) (1) from door key cylinder assembly (LH side).
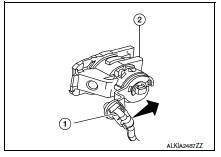
- While pulling outside handle (1), remove door key cylinder assembly (LH side) or outside handle escutcheon (2) (RH side).
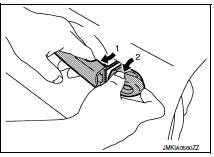
- While pulling outside handle (1), slide toward rear of vehicle to remove outside handle.
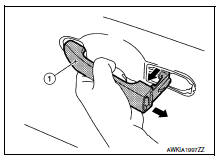
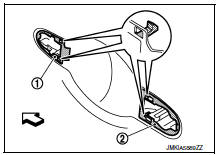
- Remove front gasket (1) and rear gasket (2).
 Front
Front
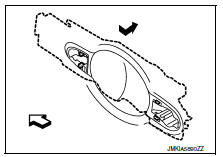
- Slide outside handle bracket toward rear of vehicle to remove.
 Front
Front
- Disconnect the outside handle cable from the outside handle bracket connection.
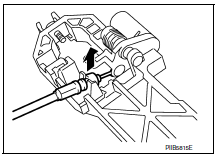
INSTALLATION
Installation is in the reverse order of removal.
CAUTION:
- When installing do not reuse front door outside handle bracket screw. Always replace screw with new ones when removed.
- When installing door key cylinder rod on the LH front door, be sure to rotate door key cylinder rod holder until a click is felt.
- Check front door lock cable is properly engaged to outside handle bracket.
- After installation, check front door open/close, lock/unlock operation.
Rear door handle
Rear door handle : exploded view
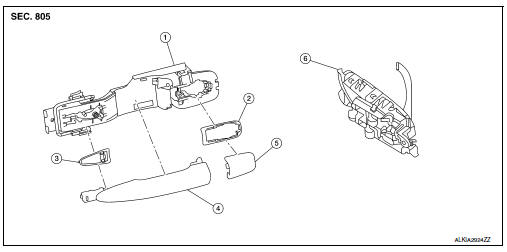
- Outside handle bracket
- Rear gasket
- Front gasket
- Outside door handle
- Outside handle escutcheon
- Inside handle assembly
Rear door handle : removal and installation - inside handle
REMOVAL
- Remove rear door finisher. Refer to INT-19, "Removal and Installation".
- Remove inside handle assembly screws (A) and inside handle assembly (1).
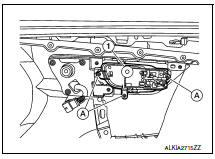
INSTALLATION
Installation is in the reverse order of removal.
CAUTION:
- Check rear door lock cables are properly engaged to inside handle.
- After installation, check rear door open/close, lock/unlock operation.
Rear door handle : removal and installation - outside handle
REMOVAL
- Fully close rear door glass.
- Remove rear door finisher. Refer to INT-19, "Removal and Installation".
- Remove rear door vapor barrier.
- Remove door side grommet, and loosen screw that retains the rear door outside handle bracket.
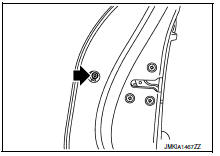
- While pulling outside handle (1), remove outside handle escutcheon (2).
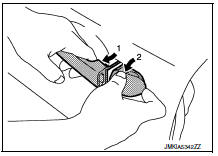
- While pulling outside handle (1), slide toward rear of vehicle to remove outside handle.
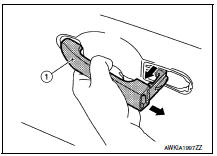
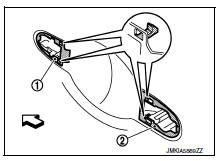
- Remove front gasket (1) and rear gasket (2).
 : Front
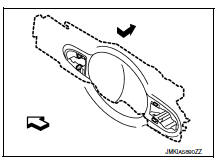
- Slide outside handle bracket toward rear of vehicle to remove.
 : Front
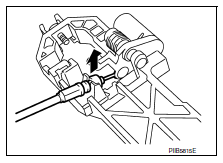
- Remove clip and disconnect the outside handle cable from the outside handle bracket.
INSTALLATION
Installation in the reverse order of removal.
CAUTION:
- When installing do not reuse rear door outside handle bracket screw. Always replace screw with new ones when removed.
- Check rear door lock cable is properly engaged to outside handle bracket.
- After installation, check rear door open/close, lock/unlock operation.
 Rear door
Door assembly
Door assembly : removal and installation
Caution:
Use two people when removing or installing the rear door assembly
due to its heavy weight.
When removing and installing rear ...
 Door lock
Front door lock
Front door lock : exploded view
Outside handle bracket
Front gasket
Outside handle
Door lock assembly
Door striker
Door key cylinder rod
Inside handle assembly
Ou ...
Other materials:
U1117 Lost communication (ABS)
DTC Logic
DTC DETECTION LOGIC
DTC
CONSULT screen terms
[Trouble diagnosis content]
DTC detection condition
Possible causes
U1117
LOST COMM (ABS)
[Lost Communication With
ABS]
When the ignition switch is ON, TCM is unable
to receive the CAN communications ...
Vehicle load capacity
Do not exceed the load limit of your vehicle
shown as “The combined weight of
occupants and cargo� on the Tire and
Loading Information label. Do not exceed
the number of occupants shown as
“Seating Capacity� on the Tire and Loading
Information label.
To get “the combined weight of ...
Dlc branch line circuit
Diagnosis procedure
1.Check connector
Turn the ignition switch off.
Disconnect the battery cable from the negative terminal.
Check the terminals and connectors of the data link connector for
damage, bend and loose connection
(connector side and harness side).
Is the inspection resul ...
