Nissan Sentra Owners Manual: Rear-facing child restraint installation using LATCH
Refer to all Warnings and Cautions in the “Child safety” and “Child restraints” sections before installing a child restraint.
NISSAN does not recommend the use of the lower anchors if the combined weight of the child and the child restraint exceeds 65 lbs (29.5 kg). If the combined weight of the child and the child restraint is greater than 65 lbs, (29.5 kg) use the vehicle’s seat belt (not the lower anchors) to install the child restraint. Be sure to follow the child restraint manufacturer’s instructions for installation.
Follow these steps to install a rear-facing child restraint using the LATCH system:
- Position the child restraint on the seat. Always follow the child restraint manufacturer’s instructions.
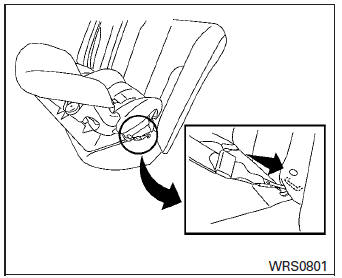
Rear-facing web-mounted – step 2
- Secure the child restraint anchor attachments to the LATCH lower anchors. Check to make sure the LATCH attachment is properly attached to the lower anchors.
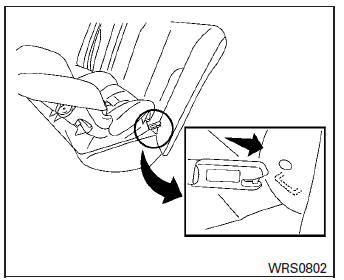
Rear-facing rigid-mounted – step 2
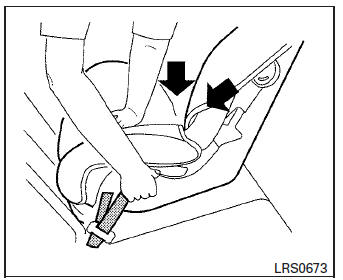
Rear-facing – step 3
- For child restraints that are equipped with
webbing-mounted attachments, remove any
additional slack from the anchor attachments.
Press downward and rearward firmly in the center of the child restraint with your hand to compress the vehicle seat cushion and seatback while tightening the webbing of the anchor attachments.
Rear-facing – step 4
- After attaching the child restraint, test it before you place the child in it. Push it from side to side while holding the child restraint near the LATCH attachment path. The child restraint should not move more than 1 inch (25 mm), from side to side. Try to tug it forward and check to see if the LATCH attachment holds the restraint in place. If the restraint is not secure, tighten the LATCH attachment as necessary, or put the restraint in another seat and test it again. You may need to try a different child restraint or try installing by using the vehicle seat belt (if applicable). Not al
- Check to make sure the child restraint is properly secured prior to each use. If the child restraint is loose, repeat steps 1 through 4.
 LATCH (Lower Anchors and Tethers for CHildren) System
WARNINGFailure to follow the warnings and
instructions
for proper use and installation of
child restraints could result in serious injury
or death of a child or other passengers
...
 Rear-facing child restraint installation using the seat belts
WARNINGThe three-point seat belt with Automatic
Locking Retractor (ALR) must be used
when installing a child restraint. Failure to
use the ALR mode will result in the child
rest ...
Other materials:
Ambient sensor signal circuit
Description
It detects outside air temperature and converts it into a resistance value
which is then input into the combination
meter.
Diagnosis Procedure
Regarding wiring diagram information, refer to mwi-28, "wiring diagram".
1.Check ambient sensor signal circuit
Turn igniti ...
Precaution
Precaution for Supplemental Restraint System (SRS) "AIR BAG" and "SEAT
BELT PRE-TENSIONER"
The Supplemental Restraint System such as –≤–Ç—öAIR BAG–≤–Ç—ú and –≤–Ç—öSEAT BELT PRE-TENSIONER–≤–Ç—ú,
used along
with a front seat belt, helps to reduce the risk or severity of injur ...
P1212 TCS Communication line
Description
This CAN communication line is used to control the smooth engine operation
during the TCS operation. Pulse
signals are exchanged between ECM and –≤–Ç—öABS actuator and electric unit (control
unit)–≤–Ç—ú.
Be sure to erase the malfunction information such as DTC not only for –≤–Ç— ...
