Nissan Sentra Service Manual: Parking brake control
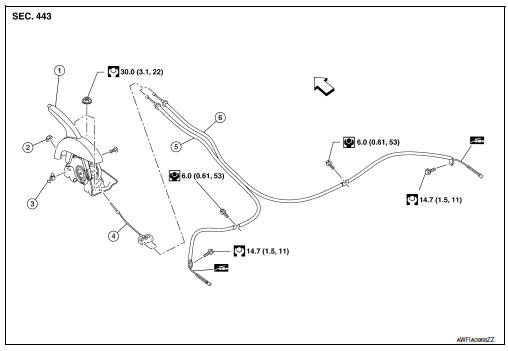
Exploded View
-
Parking brake lever assembly
-
Adjusting nut
-
Parking brake switch
-
Front parking brake cable
-
Rear parking brake cable (LH)
-
Rear parking brake cable (RH)
 Front
Front
Removal and Installation
REMOVAL
Parking Brake Control
-
Remove rear wheels and tires using power tool. Refer to WT-47, "Adjustment".
-
Remove the center console assembly. Refer to IP-14, "Removal and Installation".
-
Disconnect the parking brake switch harness connector.
-
Remove adjusting nut and loosen front parking brake cable.
-
Remove the parking brake lever assembly.
Rear Parking Brake Cable
-
Pull equalizer (A) of the front parking brake cable (1) in a rearward direction and then push upward to remove each rear parking brake cable (2)
-
Remove sub muffler and heat plate. Refer to EX-5, "Removal and Installation".
-
Remove rear parking brake cable from toggle lever. Refer to BR-42, "Exploded View" (drum brake) or PB- 9, "Exploded View - Disc Brake" (disc brake).
-
Remove rear parking brake cable bolts.
-
Press the pawl (1) to remove each rear parking brake cable from the vehicle.
INSTALLATION
Installation is in the reverse order of removal.
CAUTION:
Do not reuse adjusting nut.
-
Perform adjustment after installation. Refer to PB-4, "Inspection and Adjustment".
Adjustment
ADJUSTMENT AFTER INSTALLATION
Adjust the parking brake lever stroke. Refer to PB-4, "Inspection and Adjustment".

 Parking brake shoe
Removal and Installation - Drum Brake
If equipped with drum brakes, refer to BR-42, "Removal and
Installation".
Exploded View - Disc Brake
Anti-rattle pin
Back plate
...
Other materials:
General maintenance
During the normal day-to-day operation of the
vehicle, general maintenance should be performed
regularly as prescribed in this section. If
you detect any unusual sounds, vibrations or
smells, be sure to check for the cause or have a
NISSAN dealer do it promptly. In addition, you
should notify ...
Diagnosis system (BCM) (without intelligent key system)
Common item
Common item : consult function (bcm - common item)
APPLICATION ITEM
CONSULT performs the following functions via CAN communication with BCM.
Direct Diagnostic Mode
Description
ECU identification
The BCM part number is displayed.
Self Diagnostic Result
...
Unit disassembly and assembly
Center console assembly
Exploded View
Center console upper finisher
Center console side finisher (RH)
Center console side finisher (LH)
Center console side finisher screw cover
(LH/RH)
Center console assembly
Center console screw cover (LH/RH)
Center console rear finisher
C ...
