
Nissan Sentra Owners Manual: Keyfob (if so equipped)
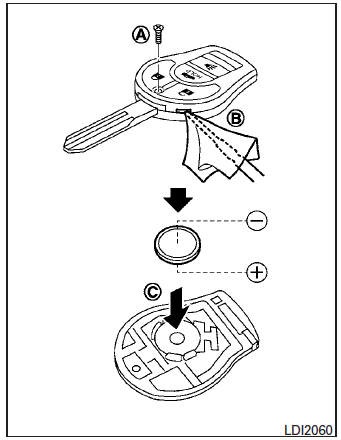
Replace the battery in the keyfob as follows:
- Remove the screw A .
- Insert a small screwdriver into the slit of the corner B and twist it to separate the upper part from the lower part. Use a cloth to protect the casing.
- Replace the battery with a new one.
- Do not touch the internal circuit and electric terminals as doing so could cause a malfunction.
- Make sure that the + side faces the bottom of the case C .
Recommended battery: CR1620 or equivalent.
- Close the lid and install the screw securely.
- Operate the buttons to check its operation.
See a NISSAN dealer if you need assistance for replacement.
If the battery is removed for any reason other than replacement, perform step 5.
- An improperly disposed battery can hurt the environment. Always confirm local regulations for battery disposal.
- The keyfob is water-resistant; however, if it does get wet, immediately wipe completely dry.
- The operational range of the keyfob extends to approximately 33 ft (10 m) from the vehicle. This range may vary with conditions.
Operation is subject to the following two conditions: (1) This device may not cause harmful interference, and (2) this device must accept any interference received, including interference that may cause undesired operation of the device.
FCC Notice: For USA: This device complies with Part 15 of the FCC Rules. Operation is subject to the following two conditions: (1) This device may not cause harmful interference, and (2) this device must accept any interference received, including interference that may cause undesired operation.
Note:
Changes or modifications not expressly approved by the party responsible for compliance could void the user’s authority to operate the equipment.
For Canada: This device complies with RSS-210 of Industry Canada. Operation is subject to the following two conditions: (1) this device may not cause interference, and (2) this device must accept any interference, including interference that may cause undesired operation of the device.
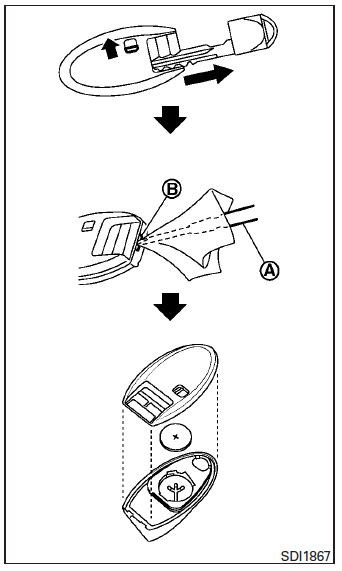
 Battery replacement
CAUTION
Be careful not to allow children to swallow
the battery or removed parts. ...
 NISSAN Intelligent Key® (if so equipped)
Replace the battery in the Intelligent Key as follows:
Remove the mechanical key from the Intelligent
Key.
Insert a small screwdriver A into the slit B
of the corner and twist it to separate ...
Other materials:
Power window and door lock/unlock switch RH
Removal and Installation
REMOVAL
Release the pawls using a suitable tool and lift the power window and
door lock/unlock switch RH and finisher
as an assembly and remove.
Disconnect the harness connector from the power window and door
lock/unlock switch RH.
Release the four pawls (tw ...
Removal and installation
Audio unit
Exploded view
Audio unit
Audio unit bracket (LH)
Audio unit bracket (rh)
Removal and installation
Removal
Disconnect the negative battery terminal. Refer to pg-50, "removal and
installation (battery)".
Remove cluster lid c lower. Refer to ip-20, "re ...
Inside key antenna
Console
CONSOLE : Removal and Installation
REMOVAL
Remove the shift selector finisher. Refer to IP-17, "Removal and
Installation".
Remove the inside key antenna (console) screws (A) and inside
key antenna (console) (1).
INSTALLATION
Installation is in the reverse order ...
