
Nissan Sentra Owners Manual: Floor mats
WARNING
|
The use of genuine NISSAN floor mats can extend the life of your vehicle carpet and make it easier to clean the interior. Mats should be maintained with regular cleaning and replaced if they become excessively worn.
Floor mat positioning aid
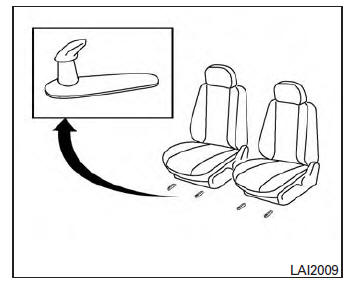
This vehicle includes two driver’s side front floor mat brackets and two passenger’s side front floor mat brackets to help keep your floor mats in place. Genuine NISSAN floor mats have been specially designed for your vehicle model. The driver’s and passenger’s side floor mats have two grommet holes incorporated in them. Position each mat by placing the floor mat bracket hook through the floor mat grommet holes while centering the mat in the floorwell.
Periodically check to make certain the mats are properly positioned.
 Air fresheners
Most air fresheners use a solvent that could affect
the vehicle interior. If you use an air freshener,
take the following precautions:
Hanging-type air fresheners can cause permanent
discolora ...
 Seat belts
The seat belts can be cleaned by wiping them
with a sponge dampened in a mild soap solution.
Allow the belts to dry completely in the shade
before using them. See “Seat belt maintenance�
in ...
Other materials:
Hazard warning flasher switch
Push the switch on to warn other drivers when
you must stop or park under emergency conditions.
All turn signal lights flash.
WARNING
If stopping for an emergency, be sure to
move the vehicle well off the road.
Do not use the hazard warning flashers
while moving on th ...
Removal and installation
Audio unit
Exploded view
Audio unit
Audio unit bracket (LH)
Audio unit bracket (rh)
Removal and installation
Removal
Disconnect the negative battery terminal. Refer to pg-50, "removal and
installation (battery)".
Remove cluster lid c lower. Refer to ip-20, "re ...
Ecm branch line circuit
Diagnosis Procedure
1.CHECK CONNECTOR
Turn the ignition switch OFF.
Disconnect the battery cable from the negative terminal.
Check the terminals and connectors of the ECM for damage, bend and loose
connection (unit side and
connector side).
Is the inspection result normal?
YES > ...
