Nissan Sentra Service Manual: Diagnosis and repair work flow
Work flow
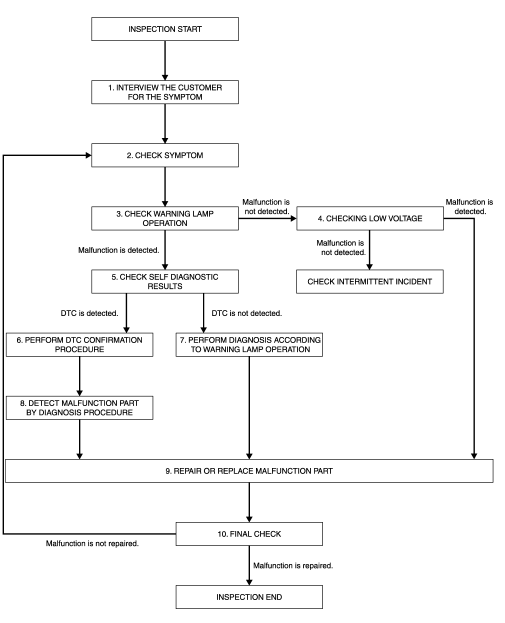
OVERALL SEQUENCE
DETAILED FLOW
1.INTERVIEW THE CUSTOMER FOR THE SYMPTOM
Interview the customer for the symptom (the condition and the environment when the incident/malfunction occurs).
>> GO TO 2.
2.CHECK SYMPTOM
Check the symptom from the customer information.
>> GO TO 3.
3.CHECK WARNING LAMP OPERATION
Check air bag warning lamp operation in the user mode. Refer to SRC-15, "On Board Diagnosis Function".
Are any malfunction detected? YES >> GO TO 5.
NO >> GO TO 4.
4.CHECK LOW VOLTAGE
Check low voltage.
Are any malfunction detected? YES >> GO TO 9.
NO >> Check intermittent incident. Refer to GI-39, "Intermittent Incident".
5.CHECK SELF DIAGNOSTIC RESULTS
Check self diagnostic result with CONSULT or diagnosis mode.
If it is impossible to switch to diagnosis mode, follow the same procedure that DTC is not detected.
NOTE:
Perform the following procedure if DTC is detected.
- Record DTC (Print them out with CONSULT.)
- Erase self diagnostic result.
- Study the relationship between the malfunction that DTC or air bag warning lamp indicates and the symptom that the customer describes.
- Check related service bulletins for information.
Is DTC detected? YES >> GO TO 6.
NO >> GO TO 7.
6.PERFORM DTC CONFIRMATION PROCEDURE
Perform DTC CONFIRMATION PROCEDURE for the DTC.
>> GO TO 8.
7.PERFORM DIAGNOSIS ACCORDING TO WARNING LAMP OPERATION
- Check air bag warning lamp operation in the user mode. Refer to SRC-15, "On Board Diagnosis Function".
- Perform Diagnosis Procedure for the air bag warning lamp operation. Refer to SRC-15, "On Board Diagnosis Function" (USER MODE).
>> GO TO 9.
8.DETECT MALFUNCTIONING PART BY DIAGNOSTIC PROCEDURE
Inspect according to Diagnostic Procedure of the DTC.
>> GO TO 9.
9.REPAIR OR REPLACE THE MALFUNCTION PART
Repair or replace the malfunctioning part.
>> GO TO 10.
10.FINAL CHECK
Check self diagnostic result and air bag warning lamp operation in the user mode.
Is the malfunction repaired? YES >> INSPECTION END
NO >> GO TO 2.
 Basic inspection
...
 Inspection and adjustment
Additional service when replacing control unit
ADDITIONAL SERVICE WHEN REPLACING CONTROL UNIT : Description
WARNING:
Always perform zero point reset using CONSULT when removing and
installing th ...
Other materials:
Removal and installation
Hood
Hood assembly
Hood assembly : exploded view
Hood hinge (LH/RH)
Hood assembly
Hood bumper rubber
Hood seal
Hood insulator
Hood support rod
Hood support rod clamp
Clip
Hood assembly : removal and installation
CAUTION:
Use two people when removing or installing h ...
Sun visors
To block glare from the front, swing down the
sun visor.
To block glare from the side, remove the sun
visor from the center mount and swing the
visor to the side.
Slide the extension sun visor in or out as
needed.
CAUTION
Do not store the sun visor before returning
the exte ...
Symptom diagnosis
The sport mode indicator lamp does not turn on
Description
The sport mode indicator lamp does not turn on when the sport mode switch is
operated.
Diagnosis procedure
1.Perform combination meter on board diagnosis
Perform combination meter on board diagnosis. Refer to mwi-16, "descriptio ...
