Nissan Sentra Service Manual: Coil spring
Exploded View
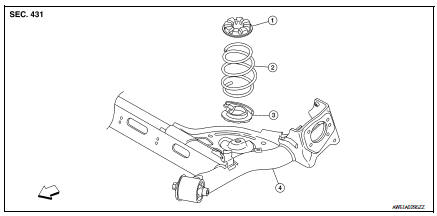
- Upper rubber seat
- Coil spring
- Lower rubber seat
- Rear suspension beam
 Front
Front
Removal and Installation
REMOVAL
- Set a suitable jack under the rear suspension beam.
CAUTION:
- At this step, the jack must be set only for supporting the removal procedure. For details on jacking up the vehicle, refer to GI-31, "Garage Jack and Safety Stand and 2-Pole Lift".
- Do not damage the rear suspension beam with the jack.
- Remove the lower shock absorber bolts. Refer to RSU-8, "Exploded View".
- Slowly lower the suitable jack. Remove the upper rubber seat, the coil spring, and the lower rubber seat from the rear suspension beam.
CAUTION:
Make sure the rear suspension beam is stable when using the jack.
- Inspect the components. Refer to RSU-12, "Inspection".
INSTALLATION
Installation is in the reverse order of removal.
- Identify the upper side of the coil spring.
 : Upper side
NOTE:
The top of the coil spring has a flat shape.
- Align the lower end of the coil spring with the steps on the lower rubber seat.
Inspection
INSPECTION AFTER REMOVAL
Check the upper rubber seat, the lower rubber seat, and the coil spring for deformation, cracks, and damage.
Replace the parts if necessary.
 Rear shock absorber
Exploded View
Rear suspension beam
Shock absorber
Bound bumper
Bound bumper cover
Washer
Bushing
Distance tube
Bushing
Washer
Piston rod lock nut
Cap
Front
Removal and ...
 Rear suspension beam
Exploded View
Rear suspension beam
Rear suspension arm bracket
Front
Removal and Installation
NOTE:
When removing components such as hoses, tubes, lines, etc., cap or plug
openings ...
Other materials:
Map lamp
Removal and installation
Removal
Lower front edge of map lamp (1) down from the headlining by
releasing the metal clips, then slide forward to clear pawls at
rear.
: Metal clip
Pawl
Disconnect the harness connectors from the map lamp and remove.
Installation
Installation is in t ...
C1155 BR Fluid level low
DTC Logic
Dtc detection logic
Dtc
Display item
Malfunction detected condition
Possible cause
C1155
C1155 br fluid level low
Brake fluid level is low or communication line between
the abs actuator and electric unit (control unit) and brake
fluid level switch is ...
Front drive shaft
6M/T
6M/T : Exploded View (LH)
Front drive shaft
Nut retainer
Cotter pin
Molykote M77
Front
6M/T : Removal and Installation (LH)
NOTE:
When removing components such as hoses, tubes, lines, etc., cap or plug
openings to prevent fluid from spilling.
REMOVAL
Remove the ...
