Nissan Sentra Service Manual: Front door glass
Removal and Installation
REMOVAL
WARNING:
- Before servicing, turn ignition switch OFF, disconnect both battery terminals and wait at least three minutes.
- Do not use air tools or electric tools for servicing.
NOTE:
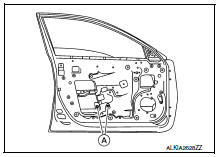
LH front door panel shown; RH side similar
- Disconnect the battery positive and negative terminal. Refer to PG-50, "Removal and Installation (Battery)".
- Remove the front door finisher. Refer to INT-15, "Removal and Installation".
- Remove the vapor barrier.
CAUTION:
Use care to not damage or tear vapor barrier during removal.
- Temporarily reconnect both battery terminals and the main power window and door lock/unlock switch (LH door) or power window and door lock/unlock switch (RH door) to raise/lower the door glass until the door glass bolts can be seen through the access holes.
- Remove the front door regulator to glass bolts (A).
- While holding the front door glass, raise it at the rear end to pull the front door glass out of the sash toward the outside of the door.
INSTALLATION
Installation is in the reverse order of removal.
FRONT DOOR GLASS INSPECTION AFTER INSTALLATION
- Check that the door glass is securely set into the glass run groove.
- Lower the door glass slightly [approximately 10 to 20 mm (0.4 to 0.8 in)] and check that the clearance to the sash is parallel. If the clearance between the door glass and sash is not parallel, loosen the regulator bolts, guide rail bolts, and door glass and guide rail bolts to correct the glass position.
Inspection and Adjustment
SYSTEM INITIALIZATION (IF NECESSARY)
- If any of the following occur, system initialization must be performed.
- Electric power supply to power window switch or motor is interrupted by blown fuse or disconnecting battery cable, etc.
- Removal and installation of the regulator assembly.
- Removal and installation of the motor from the regulator assembly.
- Removal and installation of the harness connector of the power window switch.
- Operation of the regulator assembly as a unit.
- Removal and installation of the door glass.
- Removal and installation of the door glass run.
- Window is partly opened and or closed multiple times with out being fully closed.
- To perform system initialization, refer to PWC-29, "Work Procedure".
INSPECT THE FUNCTION OF THE ANTI-PINCH SYSTEM.
To inspect the anti-pinch system, refer to PWC-29, "Work Procedure".
 Windshield glass
Exploded View
Windshield glass molding
Spacer
Rubber dam
Windshield glass
Windshield insulator
Front pillar finisher
Instrument panel
Cowl top cover
Roof panel
Cowl top
Bo ...
 Front regulator
Exploded View
Front door panel
Front door glass channel front
Front door glass regulator
Front door glass regulator motor
Front door glass channel rear
Front door glass
Front door ...
Other materials:
Fuel (Regular Unleaded Gasoline Recommended)
Use unleaded regular gasoline with an octane rating of at least 87 AKI
(Anti-Knock Index) number (Research
octane number 91). E-85 fuel (85% fuel ethanol, 15% unleaded gasoline) may only
be used in vehicles specifically
designed for E-85 fuel (i.e. Flexible Fuel Vehicle - FFV models).
CAUTION ...
Evaporative emission system
Inspection
EVAP CANISTER
1.CHECK EVAP CANISTER
Block port (B).
Blow air into port (A) and check that it flows freely out of port (C).
Release blocked port (B).
Apply vacuum pressure to port (B) and check that vacuum pressure
exists at the ports (A) and (C).
Block port (A) and (B).
...
Fuel level sensor unit, fuel filter and fuel pump assembly
Exploded View
Lock ring
Fuel level sensor, fuel filter and fuel
pump assembly
O-ring
Fuel tank
Removal and Installation
WARNING:
Read “General Precautions” when working on the fuel system. Refer to
FL-2, "General Precaution".
NOTE:
When removing componen ...
