
Nissan Sentra Service Manual: Clutch disc and clutch cover
Exploded View
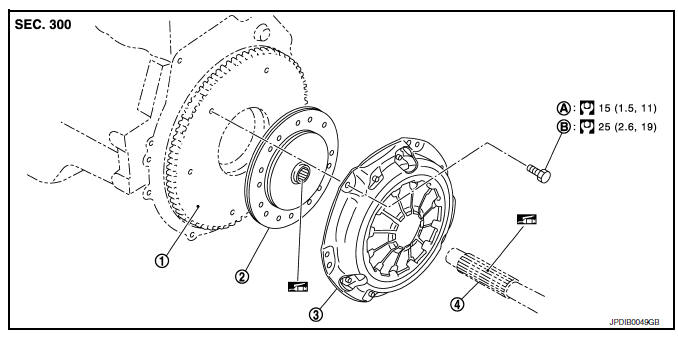
- Flywheel
- Clutch disc
- Clutch cover
- Input shaft
- First step
- Final step
 Apply lithium-based grease
including molybdenum disulphide.
Removal and Installation
CAUTION:
- Do not reuse CSC (Concentric Slave Cylinder). The CSC slides back
to the original position every
time the transaxle assembly is removed. This action may allow dust or
contaminants to gather on
the sliding parts and damage a seal of CSC causing clutch fluid leakage.
Refer to CL-16, "Removal and Installation".
- Do not allow any grease to contact the clutch disc facing, pressure plate surface or flywheel surface.
- Do not clean clutch disc using solvent.
REMOVAL
- Remove engine and transaxle assembly. Refer to TM-28, "Removal and Installation".
- Loosen clutch cover bolts evenly while holding clutch cover.
- Remove clutch cover and clutch disc.
CAUTION:
Do not drop clutch disc.
INSTALLATION
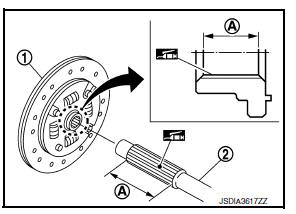
- Clean clutch disc and input shaft splines to remove grease and dust caused by abrasion.
- Apply recommended grease to clutch disc (1) and input shaft (2) splines area (A).
CAUTION:
Be sure to apply grease to the points specified. Otherwise, noise, poor disengagement, or damage to the clutch may result. Excessive grease may cause slip or shudder. And if it adheres to seal of CSC, it may cause clutch fluid leakage.
Wipe off excess grease. Wipe off any grease oozing from the parts.
- Install clutch disc, using a suitable tool (A).
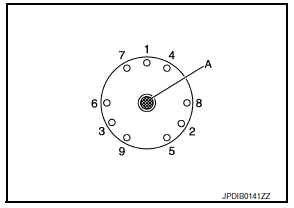
- Install clutch cover, and then temporarily tighten clutch cover bolts.
- Tighten clutch cover bolts to the specified torque evenly in two steps in the numerical order as shown.
- Install engine and transaxle assembly. Refer to TM-28, "Removal and Installation".
Inspection
INSPECTION AFTER REMOVAL
Clutch Disc
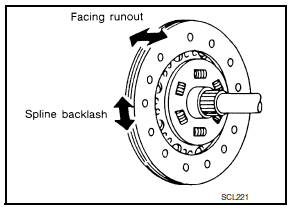
- Measure clutch facing runout. If it is outside the specification, replace clutch disc.
Runout limit/diameter of the area to be measured : Refer to CL-20, "Clutch Disc".
- Measure spline backlash at outer edge of clutch disc. If it is outside the specification, replace clutch disc.
Maximum allowable spline backlash (at outer edge of disc) : Refer to CL-20, "Clutch Disc".
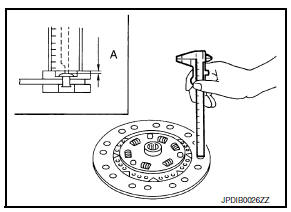
- Measure the depth “A) to clutch disc facing rivet heads, using suitable tool. If it exceeds the allowable wear limit, replace clutch disc.
Facing wear limit (depth to the rivet head) “A” : Refer to CL-20, "Clutch Disc".
Clutch Cover
- Check clutch cover thrust ring for wear or damage. If wear or damage is found, replace clutch cover.
NOTE:
- Worn thrust ring will generate a beating noise when tapped at the rivet using suitable tool
- Broken thrust ring will make a clinking sound when cover is shaken up and down.
- If a trace of burn or discoloration is found on the clutch cover pressure plate to clutch disc contact surface, repair the surface with sandpaper. If surface is damaged or distorted, replace clutch cover.
INSPECTION AFTER INSTALLATION
Clutch Cover
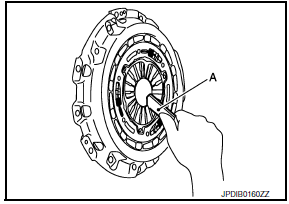
Check diaphragm spring lever claws for unevenness with the clutch cover installed on the engine. If they exceed the tolerance, adjust diaphragm spring lever using Tool (A).
Tolerance for diaphragm spring lever unevenness : Refer to CL-20, "Clutch Cover".
Tool number : ST20050240 ( � )
 CSC(concentric slave cylinder)
Exploded View
Transaxle assembly
CSC (Concentric Slave Cylinder)
Removal and Installation
CAUTION:
Do not reuse CSC (Concentric Slave Cylinder). The CSC slides back
to the origina ...
 Service data and specifications (SDS)
General Specifications
Clutch Pedal
Clutch Disc
Clutch Cover
...
Other materials:
Od off indicator lamp
Component Function Check
1.CHECK OD OFF INDICATOR LAMP FUNCTION
Check OD OFF indicator lamp turns ON for approx. 2 seconds when ignition
switch turns ON.
Is the inspection result normal?
YES >> INSPECTION END
NO >> Go to TM-239, "Diagnosis Procedure".
Diagnosis Proce ...
Rear drum brake
Exploded View
Cap
Bleeder valve
Piston
Spring
Boot
Piston cup
Wheel cylinder
Apply rubber grease
Apply PBC (Poly Butyl Cuprysil)
grease or silicone-based grease
Apply brake fluid
Disassembly and Assembly
DISASSEMBLY
Remove the boot from wheel cylinder. Refer t ...
Front wiper drive assembly
Exploded view
Wiper blade (RH)
Wiper arm (RH)
Wiper drive assembly
Wiper arm (LH)
Wiper blade (LH)
Removal and installation
REMOVAL
Remove the cowl top. Refer to EXT-26, "Removal and Installation".
Disconnect the harness connector from the wiper drive assembly.
...
